I come across this type of need so may time in my entire career of Sitecore Development. Where I need to find the duplicate value in item’s field. I am writing this as note to me for my own future reference. Hopping this will also help my Sitecore community.
$dictionaryItems = Get-Item -Path 'master:' -Query "/sitecore/system/Dictionary//*[@@templateid='{6D1CD897-1936-4A3A-A511-289A94C2A7B1}']" | Select-Object -Property ID, DisplayName, @{Label="DictionaryKey"; Expression= {$_['Key']}}
$uniqueCollection = $null
foreach ($item in $dictionaryItems){
    if($uniqueCollection -Contains $($item.DictionaryKey)){
        Write-Host "Duplicate Field Value found in item ID  $($item.ID)"
    }
    else{
        $uniqueCollection += $item.DictionaryKey
    }
}
Recently, I am working on a bug reported by one of our tester. The issue stating none of the Coveo pages on few of the SXA websites working post upgrade of Coveo SXA module.
The Issue
The website suddenly started showing error message “The component is not available at this moment. Please contact the site administrator.” under Coveo’s Search Resources Component on the website pages.
Strangely, the same functionality(or rather I say partial design) used by other SXA website are working like charm. But only 2 websites which has whole Coveo Search functionality has been broken.
The Finding
First obvious thing I did was open the Google and search for the error message. After some time spending on reading multiple blogs and articles, I come with this link on Coveo’s articles.
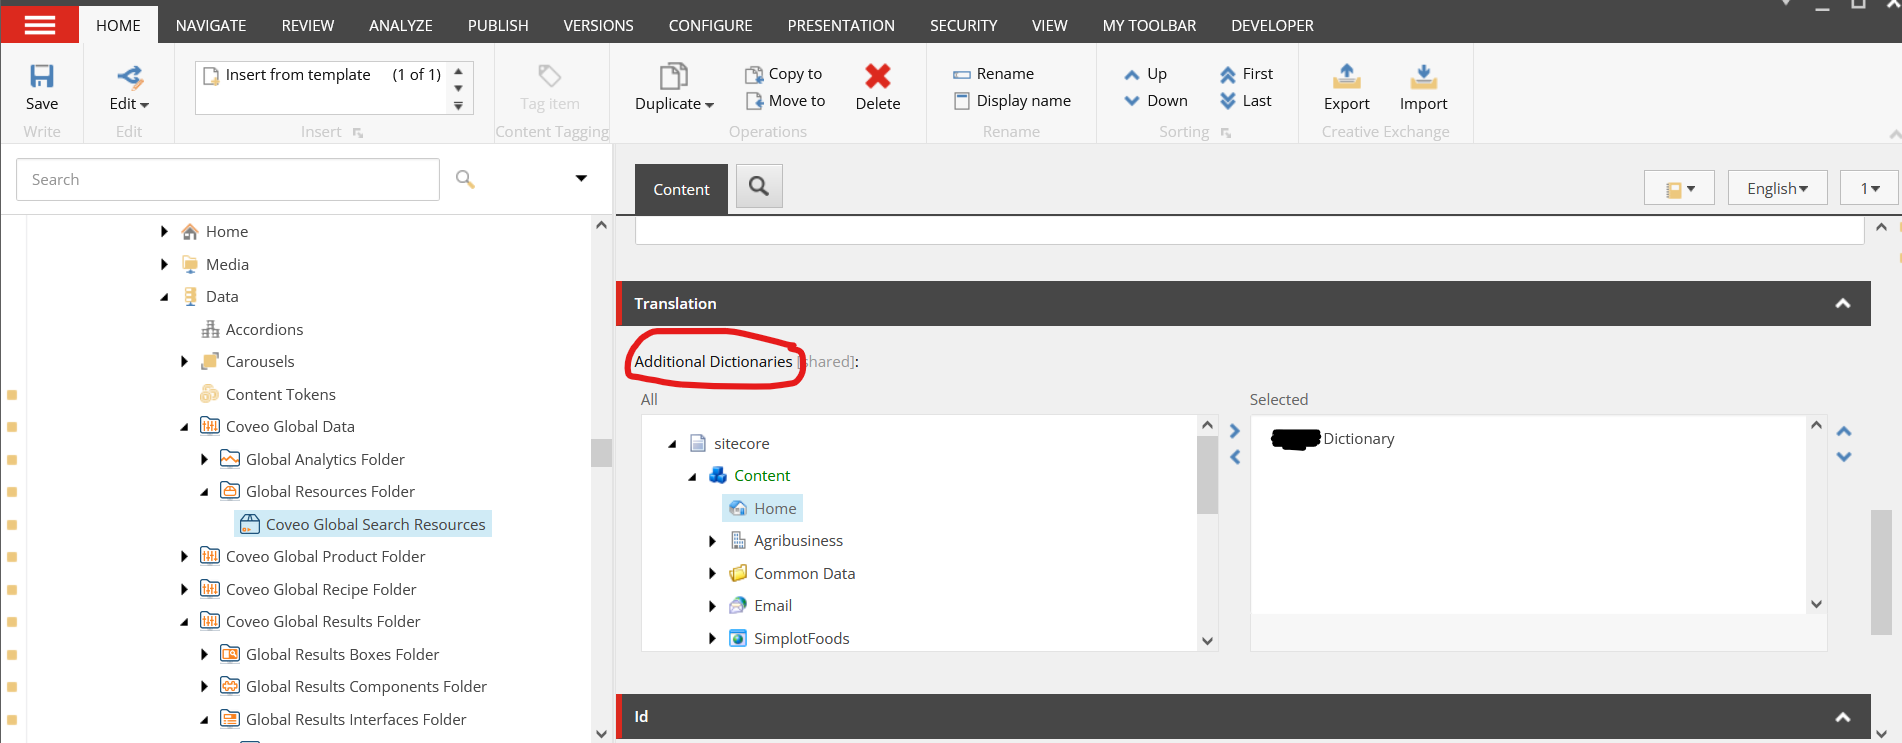
As Article suggested, I have verified both the conditions, firstly checked extranet/Anonymous(user and domain configure with Site Definition) has read access to both Sitecore/System/Dictionary items and additional dictionary item configured at the Coveo Search Resource Data source item. Secondly, checked we have correct dictionary item selected under the field Additional Dictionaries for Coveo Search Resources item configured as data source to respected UI component.
Now, I was trying to isolate the issue, to make sure the issue is due to either dictionary or its child items. So, I tried to remove the dictionary item form the additional dictionary field, publish the item and magically all the broken Coveo Pages started working…!!!
So now, I am sure there is something to do with the dictionary item for that SXA website.
The Solution
I started decoding the Coveo Search Resources SXA UI component and found the logic for getting the component properties have a validation which validates the unique dictionary keys under the selected dictionary.
This is a great lead…..!!!(it took me fair few hours of dotPeeking to find this out) That left me with great confidence that there are some dictionary entry item which has the duplicate value in the Field Key.
I did first obvious check of unique item name by turning validation rule on via Sitecore’s Content Editor’s left gutter.
But none of the dictionary entry items have duplicate name. So now, I need to relay on my Poweshell skills to find the duplicate value on Key field of item /sitecore/templates/System/Dictionary/Dictionary entry.
I removed that unwanted entry item which is lately added by one of the content editor while copying dictionary entries from older SXA website to the new one.
While you have a high functional developers team working on multiple Sitecore projects with same code base, it is very vital to keep the local development environment as stable and functional as possible and also keep PR short.
While achieving that stage, we came across one small issue which is intern made me to write a blog in my journal what you are reading now.
The Issue
While reviewing PRs, we observed, there is one Unicorn’s .yml file come as default to quite a few PRs. The change it has got was just few fields updated.
After quick initial investigation, found out that yml file is nothing but one of the Data Exchange Framework(DEF) batch processing item in Sitecore content tree under system node.
After bit more investigation, it turns out the sitecore’s schedule task is triggering that DEF batch process. But that raise another question, why that schduler task item is not coming as changed item list as it is also source controled using Unicorn.
The Resolution
Lets focus on the second question for now, as it has quite a quick and simple answer.
The \App_Config\Include\Unicorn\Unicorn.config has one section called <fieldFilter> which takes care of it. As few frequently value changing fields has already been excluded from being serialized (smart stuff Unicorn Developers).
That section is looking like below
<fieldFilter type="Rainbow.Filtering.ConfigurationFieldFilter, Rainbow" singleInstance="true">
					<exclude fieldID="{B1E16562-F3F9-4DDD-84CA-6E099950ECC0}" note="'Last run' field on Schedule template (used to register tasks)" />
					<exclude fieldID="{52807595-0F8F-4B20-8D2A-CB71D28C6103}" note="'__Owner' field on Standard Template" />
					<exclude fieldID="{8CDC337E-A112-42FB-BBB4-4143751E123F}" note="'__Revision' field on Standard Template" />
					<exclude fieldID="{D9CF14B1-FA16-4BA6-9288-E8A174D4D522}" note="'__Updated' field on Standard Template" />
					<exclude fieldID="{BADD9CF9-53E0-4D0C-BCC0-2D784C282F6A}" note="'__Updated by' field on Standard Template" />
					<exclude fieldID="{001DD393-96C5-490B-924A-B0F25CD9EFD8}" note="'__Lock' field on Standard Template" />
				</fieldFilter>
So now, for my initial issue to fix , I simply have to add a field I wanted to exclude form being serializedin to this fieldFilter section.
So, I created new patch configuration file (as best practice suggests) an try to patch my new exclude fields under the node <fieldFilter>. At first, I did add the config like following
<configuration xmlns:patch="http://www.sitecore.net/xmlconfig/" xmlns:role="http://www.sitecore.net/xmlconfig/role/" xmlns:environment="http://www.sitecore.net/xmlconfig/environment/">
	<sitecore role:require="Standalone or ContentManagement">
		<unicorn>
			<defaults>
				<!--
					The field filter can be used to ignore fields when comparing or serializing (i.e. don't write them to disk).
					Commonly, metadata fields such as Last Updated will be ignored to prevent SCM conflicts.
				-->
				<fieldFilter>
					<exclude patch:after="exclude[@fieldID='{001DD393-96C5-490B-924A-B0F25CD9EFD8}']" fieldID="{985BA535-0F3E-4DA8-A768-A469026DE9DB}" note="'RequestedAt' field of DEF's Pipeline Batch item" />
					<exclude patch:after="exclude[@fieldID='{001DD393-96C5-490B-924A-B0F25CD9EFD8}']" fieldID="{6A2B2CBB-4338-4814-A8A9-9FECBB90456A}" note="'LastRunFinished' field of DEF's Pipeline Batch item" />
					<exclude patch:after="exclude[@fieldID='{001DD393-96C5-490B-924A-B0F25CD9EFD8}']" fieldID="{2AA5C591-FF55-411D-96C0-978BB2C58B94}" note="'Log' field of DEF's Pipeline Batch item" />
				</fieldFilter>
			</defaults>
		</unicorn>
	</sitecore>
</configuration>
But this has weird patching when I see showconfig.appx. It actually replaces first three entries form the original xml…!!!???
I did ask God(google) and found that sitecore sometime does not patch correctly if proper attributes are not used. Someone suggest to use hint attribute to control the patching.
I did replace my patching config attribute note with the hint and eureka….!!!
This is the final configuration patch file looks like.
<configuration xmlns:patch="http://www.sitecore.net/xmlconfig/" xmlns:role="http://www.sitecore.net/xmlconfig/role/" xmlns:environment="http://www.sitecore.net/xmlconfig/environment/">
	<sitecore role:require="Standalone or ContentManagement">
		<unicorn>
			<defaults>
				<!--
					The field filter can be used to ignore fields when comparing or serializing (i.e. don't write them to disk).
					Commonly, metadata fields such as Last Updated will be ignored to prevent SCM conflicts.
				-->
				<fieldFilter>
					<exclude patch:after="exclude[@fieldID='{001DD393-96C5-490B-924A-B0F25CD9EFD8}']" fieldID="{985BA535-0F3E-4DA8-A768-A469026DE9DB}" hint="'RequestedAt' field of DEF's Pipeline Batch item" />
					<exclude patch:after="exclude[@fieldID='{001DD393-96C5-490B-924A-B0F25CD9EFD8}']" fieldID="{6A2B2CBB-4338-4814-A8A9-9FECBB90456A}" hint="'LastRunFinished' field of DEF's Pipeline Batch item" />
					<exclude patch:after="exclude[@fieldID='{001DD393-96C5-490B-924A-B0F25CD9EFD8}']" fieldID="{2AA5C591-FF55-411D-96C0-978BB2C58B94}" hint="'Log' field of DEF's Pipeline Batch item" />
				</fieldFilter>
			</defaults>
		</unicorn>
	</sitecore>
</configuration>
After this, Unicorn re-serialized the DEF pipeline batch items and happy days….!!!!
Note:
There is new feature “fieldTransforms” available in Unicorn 4.1 and later version but I have not able to get that working on my project setup. But, something worth exploring for next time.
The QA team, we are working with has raised a very interesting issue while testing newly created data report using Sitecore Poershell Extenstion(SPE).
The Issue
The data report was executing perfectly but while trying to export the data in any of pre-defined formats offered by SPE, it was not working.
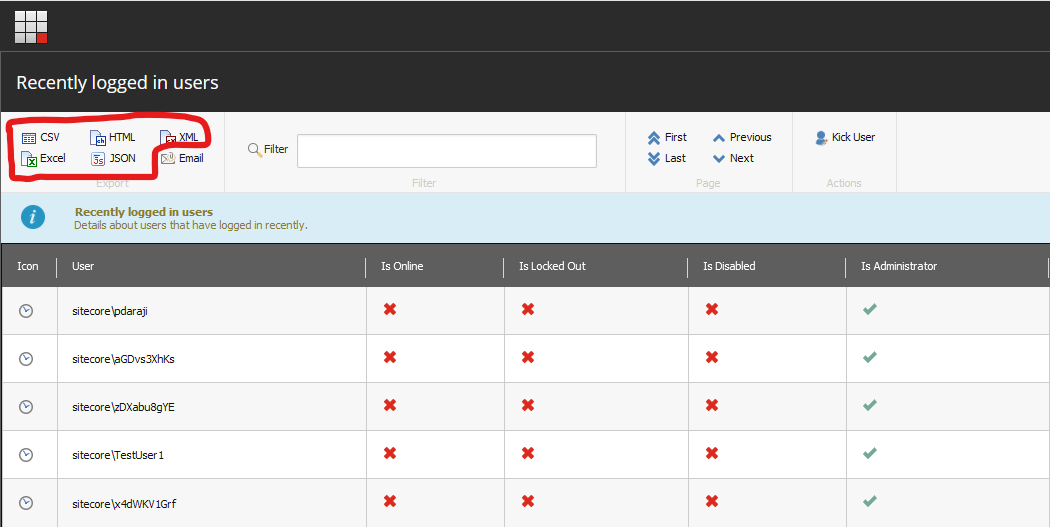
The Sitecore Powershell is allowing export of report data in various industrial standard formats out of the box as listed below:
CSV
HTML
XML
Excel
JSON
These formats have option links in the ribbon above but when clicking, none of those producing any output.
¯\_(ツ)_/¯
The Investigation
First step is to try to reproduce the issue. We tried on all the available environments and it is happening on every environment except for the local environment.
I though the issue may have to do with some missing config or SPE. So, we quickly try to re-install the SPE module on CM with no over-write option for both files and content on Integration Environment. But that does not fix the issue. ☹
So, we started listing what are the major difference from modules and features point of view between local development and other environments on Azure. It turns out that all other environments have exactly the same piece of code, configurations and modules installed except for Federated Authentication using Sitecore Identity Server for CM.
The Fix
We did quick search over the internet and one of my colleague found out that there is one file which is disabled for SPE which needs to be enable if we are using sitecore 9.1 and higher(we are running 9.3) along with identity server.
The file needs to be enabled is Spe.IdentityServer.config file which is part of the SPE package.
Once package is installed, the file is located at path <<website Root>>\App_Config\Include\Spe\Spe.IdentityServer.config.disabled. The content of this disabled file is as below.
<configuration xmlns:patch="http://www.sitecore.net/xmlconfig/" xmlns:role="http://www.sitecore.net/xmlconfig/role/" xmlns:security="http://www.sitecore.net/xmlconfig/security/">
  <sitecore role:require="Standalone or ContentManagement" security:require="Sitecore">
    <pipelines>
      <owin.cookieAuthentication.validateIdentity>
        <processor type="Sitecore.Owin.Authentication.Pipelines.CookieAuthentication.ValidateIdentity.ValidateSiteNeutralPaths, Sitecore.Owin.Authentication">
          <siteNeutralPaths hint="list">
            <!-- This entry corrects the infinite loop of ExecuteCommand in the SPE Console -->
            <path hint="spe">/sitecore%20modules/PowerShell</path>
          </siteNeutralPaths>
        </processor>
      </owin.cookieAuthentication.validateIdentity>
    </pipelines>
  </sitecore>
</configuration>
Tip: The best way to get these config enable in Docker container world, is to leave the above mentioned .disabled file as is. Create new configuration file with above content in Visual Studio solution deploying to z folder under app_config\include on your binding volume path which will be taken care by Sitecore config patching.
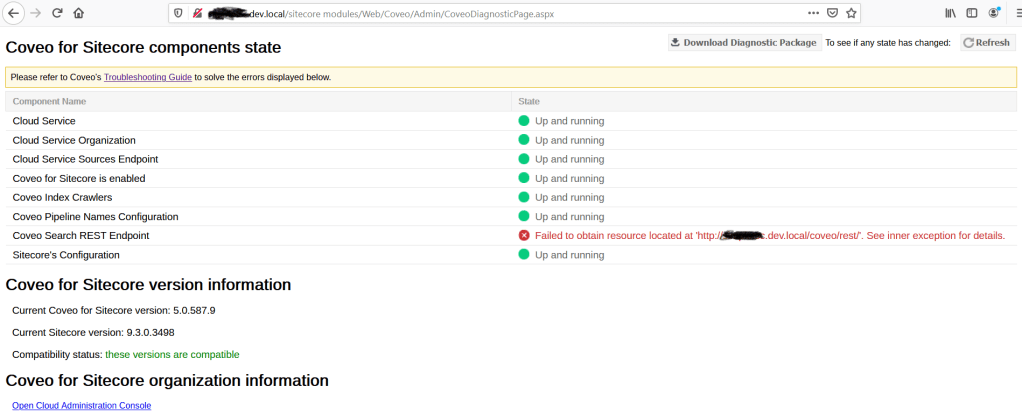
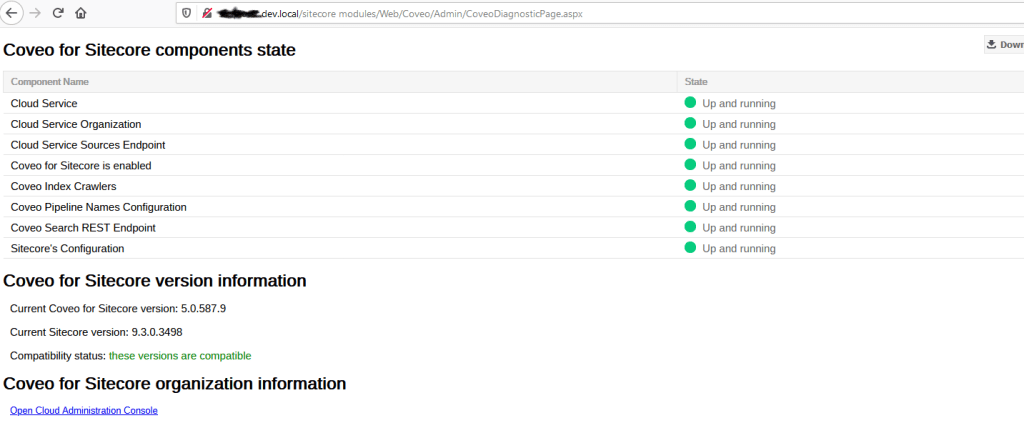
While configuring Coveo search on my local development environment using Docker, something got my attention on Coveo’s diagnosis page(<<Sitecore CM Host>>/sitecore modules/Web/Coveo/Admin/CoveoDiagnosticPage.aspx).
This page has all the green ticks except for the one. This is Coveo Search REST Endpoint. See image below for more details.
Coveo Diagnostic Page REST API Error on Docker
As usually, I copied the API end point URL and hit in the Browser and it serve the request with no error. It is HTTP-200 response with valid JSON result.
The error in the log file also not giving any lead either.
Coveo.SearchProvider.Applications.BaseVerifier.VerifyComponent(:0) ERROR StateVerifier has encountered an error while verifying the component "Coveo Search REST Endpoint".<br>Exception: Coveo.SearchProvider.Applications.StateVerifierException<br>Message: Failed to obtain resource located at 'http://sicore930.dev.local/coveo/rest/'. See inner exception for details.<br>Source: Coveo.SearchProvider.Applications<br>at Coveo.SearchProvider.Applications.CommonStateVerifier.TryPingRestEndpoint(String p_Endpoint)<br>at Coveo.SearchProvider.Applications.CommonStateVerifier.<>c__DisplayClass11_0.b__0()<br>at Coveo.SearchProvider.Applications.BaseVerifier.VerifyComponent(Func`1 p_VerifyMethod, String p_ComponentName)
I opened docker powershell command for the cm container and tried to request the host from within container.
Now things are little clear to me. The Coveo diagnosis page is using current host to make REST API request from IIS server running on the container. The container does not have host file entry to reseolve the host url.
So now, I started searching how to make entry in container’s host file??? I was sure, I am not the first person who wanted this kind of stuff.
Following command has does the trick. but for that we need to first fire up the command prompt of the cm container.
This is going to be a short blog for fixing issue I came across while working on custom pipeline creation and execution for Sitecore’s Data Exchange Framework(DEF or DxF).
The issue
While the Pipeline Batch item is selected, buttons on DATA EXCHANGE toolbar at top does not behave how they should.
Immediately after selecting pipeline item, I noticed all buttons in ribbon is visible and clickable. Secondly, clicking on Run Pipeline Batch Button does not works. I was neither starting execution of pipeline nor displaying any visible error messages. See below image for more details:
The fix
I started investigation and collecting events what could have done the damage. Found that before last deployment it was behaving the way it should be. Huuummm… that’s good hint, isn’t it? The last release just deployed files to CMS server. This is soothing to my ears as investment scope is drastically reduced to files. The content automatically gone out of equation.
To fix this, I tried install DEF SDK package first with just deploying file artifacts and skipping any content installation.
Unfortunately, that does not work ….!!! 😦
Next best bet is obvious and try to re-install the DEF framework package with deploying files only.
And that does the trick ….!!!! (Dance)
Update:
The file \App_Config\Sitecore\DataExchange\Sitecore.DataExchange.Local.config was missing. Placing this file from Package has actually fixed the issue.
Happy Data Sync and import using Sitecore Data Exchange Framework. 🙂
So far in Part – 1 and Part – 2 of this series, the Sitecore Publishing Service up & running in Azure PaaS and the Sitecore Publishing module is installed & configured.
This last part will trying to address few additional scenarios with publishing service. Scenarios like, the Sitecore databases are hosted in Azure SQL and Sitecore implementation have multiple publishing targets.
Sitecore database in Azure(Azure SQL)
If publishing service hosted on Azure web app and the databases are also in Azure SQL Database, there are few additional configurations needed for the service to work seamlessly with bigger publishing payload.
Follow below steps to configure publishing service for Azure Environment
Navigate to \configurations\system.webServer\aspNetCore node in wwwRoot\web.config file of publishing service in app service.
replace the arguments attribute with the following
arguments=" --environment azure"
Save the web.config
Stop and start app service
By default Sitecore publishing service is running under the “production” environment and that patches the configurations for production. After above change, service will start with Azure environment and it will patch azure environment specific configurations.
Navigate to wwwroot/config/azure
rename file sc.publishing.sqlazure.connections.xml.example to sc.publishing.sqlazure.connections.xml. Remove .example extension and make sure it has .xml extension.
New publishing target…!!!???
If other than default Internet publishing target is being used in CMS, there are few additional configurations needs to be made. So lets have a look at those.
I am assuming the additional publishing target also linked to additional database other than default web database. If so, the new connection string also needs to be added to publishing service.
New connection string
In this scenario, will take example of new web database in Azure SQL US region and need to add new target to publish content to web database to this US region.
Add new connection string to Publishing service. lets name it web_us
Sitecore.Framework.Publishing.Host configuration setconnectionstring web_us "<US web database connection string>"
/config/sitecore/publishing/sc.publishing.xml
Open above file and follow below steps:
navigate to Settings\Sitecore\Publishing\Services\DefaultConnectionFactory\Options\Connections
Search for the child node Internet, duplicate the whole node along with children. For example, name it InternetUS
Within that InternetUS node navigate to child node ConnectionString and change the value of the node to following to match the name of the connection sting in steps above.
${Sitecore:Publishing:ConnectionStrings:web_us}
Navigate to Settings\Sitecore\Publishing\Services\StoreFactory\Options\Stores\Targets
Search for the child node Internet, duplicate the whole node along with children. For example, name it InternetUS
Change the value of the ConnectionName to InternetUs. This must match the name of the name of the new node name under Settings\Sitecore\Publishing\Services\DefaultConnectionFactory\Options\Connections. Created in one of the step above.
Set the id of new Publishing Target item in Sitecore CMS. For example,
<Id>46FDC9AF-3F00-4D55-BDB8-86ED13F82E00</Id>
Set the value of child node ScDatabase to newly added databsae name. In our example it would be web_us.
This step is optional if the service is not using databases on Azure SQL.
Navigate to Settings\Sitecore\Publishing\Services\DefaultConnectionFactory\options\Connections\
Search for Internet node in child nodes and duplicate that node with name InternetUS along with child nodes
Save File
Bonus
Log level changing for debugging
Nothing can beat detailed level logging while debugging application/service. Default publishing service have two filters one sitecore and anther is default.
For sitecore filter the default log level is set to Information and default log level is set to Warning. See below xml for the same.
One can select log filter level to one of the following:
Trace : The most detailed log messages, may contain sensitive application data. These messages are disabled by default and should never be enabled in a production environment.
Debug : Logs that are used for interactive investigation during development should use the Debug level. These logs should primarily contain information useful for debugging and have no long-term value.
Information : Track the general flow of the application using logs at the Information level. These logs should have value in the long term.
Warning : Warnings should highlight an abnormal or unexpected event in the application flow. This event does not cause the application execution to stop, but can signify sub-optimal performance or a potential problem for the future.
Error : An error should be logged when the current flow of execution is stopped due to a failure. These should indicate a failure in the current activity, not an application-wide failure. These will mainly be unhandled exceptions and recoverable failures.
Critical : A critical log should describe an unrecoverable application or system crash, or a catastrophic failure that requires immediate attention.
To overwrite these default log level filters, use wwwroot/config/sitecore/sc.logging.xml file.
Note
The Development environment mode sets the Sitecore log level filter to Debug. So the service can be run under Development Environment for more detailed logging.
After all these configuration changes restart the publishing service.
Now that Publishing service is deployed, configure and up in Part – 1, the next bit is to install and configure Sitecore publishing service module in Sitecore CM and CD. This part is very simple and strait forward. So lets get started…
The Sitecore publishing module is nothing but Sitecore package and needs to be installed the same way as other Sitecore packages. This package contains all the necessary artifacts for this module to perform it’s job.
Download
The Sitecore Publishing Module can be downloaded from here.
Note
Just check the the version compatibility with Sitecore version where you wanted to implement this publishing service/module. For this you need to navigate to individual release page and check the compatibility detail at start of the page under the main heading.
Install publishing module
To install Sitecore publishing module, one can use OOTB Sitecore installation wizard.
==========================================================
***Important! Copy and save this information***
==========================================================
    BEFORE YOU CLICK NEXT:
    - Ensure you have installed and configured the Sitecore Publishing Service (this module only enables integration with the service)
        Documentation detailing how to install the service is available seperately.

        [Warning] This module will not work without a properly configured service instance.  No items will be able to be published.

    AFTER YOU CLOSE THE WIZARD:
    After the package is installed, follow these steps to complete the Sitecore Publishing Module installation:
    - Configure the service endpoints:
        Add a configuration file which overrides the 'PublishingServiceUrlRoot' setting to point to your service module
        Make sure the address contains a trailing slash
        e.g.
            <?xml version="1.0" encoding="utf-8"?>
            <configuration xmlns:patch="http://www.sitecore.net/xmlconfig/">
              <sitecore>
                <settings>
                  <setting name="PublishingServiceUrlRoot">http://sitecore.publishing/</setting>
                </settings>
              </sitecore>
            </configuration>
    - Configure the Content Delivery Servers:
        Ensure that the following file is in the website 'App_Config/Modules/PublishingService' directory:
            * Sitecore.Publishing.Service.Delivery.config
        Ensure that the following files exist in the website 'bin' directory:
            * Sitecore.Publishing.Service.dll
            * Sitecore.Publishing.Service.Abstractions.dll
            * Sitecore.Publishing.Service.Delivery.dll
Note
Just before installation process starts, installer will prompt the information about configurations and artifacts needed for the Sitecore Module and services to work. As instructed, copy and save that instruction shown in above(From version 3.1.3).
Configure
Once installation of the module is successful, in CM perform following steps:
For CM
Navigate to <website root>/App_Config/Modules/PublishingService folder in CM app service
Make sure the URL is post-fix with forward slash(/) at the end.
For CD
Navigate to <website root>/App_Config/Modules/PublishingService folder in both the CM and CD app services
Copy Sitecore.Publishing.Service.Delivery.config file from CM to above folder in CD
Navigate to <website root>/bin folder in both the CM and CD app services
Copy below library files to CD’s bin folder from CM
Sitecore.Publishing.Service.dll
Sitecore.Publishing.Service.Abstractions.dll
Sitecore.Publishing.Service.Delivery.dll
At this point, the publishing will start working, if there is only one default Internet publishing target is there. The Publishing Module has overwritten few of Sitecore default settings for publishing. So after installation of publishing module, one may notice change in UI for the Publishing. Please read here for more details about visual changes and changes in types of publishing.
The last part -3 will cover some specific configuration for Azure PaaS environment and some advance setting of Sitecore Publishing Service. So stay tuned and enjoy content publishing….!!!
While working on finding solution for slow publishing issue of more than 10,000 items in Azure PaaS, I came across this very powerful add-on Sitecore Publishing Services.
Believe it or not but once it is installed, configured and up, it reduced the publishing time drastically. In our case, publishing of those 10,000 items were taking around 1 hour 30 mins(hhhuuuffff…), merely took 12 mins to publish.(Super duper awesome, isn’t it…??? This makes everyone’s life easy)
Thus, I decided to write blog on whole solution. Blog will become very lengthy if I put everything in one. Thus, splitting it in three parts.
Part 1 will cover installation and basic configuration of publishing service. Part 2 will cover installation of publishing module in CMS. The third part will cover advance configuration of publishing service.
So, lets get started…
Download
You can download both Sitecore publishing service and publishing module from Sitecore’s development site here. It is the designed and developed by Sitecore itself.
Note:
Just check the version compatibility with Sitecore version where you wanted to implement this publishing service/module. see image below for more details. (As I have downloaded first the latest and greatest version 4 at the time I am writing this blog for Sitecore 9.0.1 and later figure out it is not compatible.)
Install publishing service on Azure PaaS
With my current client all their Sitecore implementation is in Azure PaaS. It absolutely makes sense to have this Sitecore Publishing service also setting in Azure PaaS. So, follow below steps to get the publishing services up as app service.
Download the service application as zip file from above link. Select the one which is matching your host architecture type either 32 bit or 64 bit.
Open Kudu – Advance tool for the web app where you want to host publishing service
in Kudu editor open command console by navigate to Debug Console menu option and select CMD
navigate to site root folder using following command
cd site\wwwroot
Drag and drop service zip file to folder view area above console. This will upload the service package to Azure web app.
Once upload completed, run following command on console below the folder view
unzip -o *.zip
Assumption
The site’s wwwroot folder has only one zip file which is recently uploaded publishing service zip file.
Once unzipping of application completed, execute following commands in CMD. This will set connection stings of core, master and web database in publishing service. Going forward, these connection strings will be used for all publishing jobs.
Sitecore.Framework.Publishing.Host configuration setconnectionstring web "<web database connection string>"
Once connection strings are configured for these databases the next step is to upgrade the database schema to required one for Sitecore publishing service
After executing above command the console displays the result of the command. The below screenshot have result with already updates schema for all the databases as I have previously upgraded the schema.
Once above commands are successfully executed, now it is the time to check the status of the publishing service web application.
In the browser open below URL
http://<<azure app service name>>.azurewebsites.net/api/publishing/maintenance/status
Above web api will return following JSON result if all the configurations are correctly set.
{
    "status": 0
}
This are basic steps to deploy Sitecore Publishing services up and running in azure PaaS. In the Part – 2, will cover installation of Sitecore Publishing Module in Sitecore CM/CA with configuration.