This is my first blog for the 2026 and I am willing to post more blogs this year. So, let’s get started!
I wanted to try something new with custom component on SItecore’s headless JSS with Next.js and for that I was trying to setup the boilerplate on my local machine as per the steps mentioned in the Sitecore’s development documentation here.
The Issue
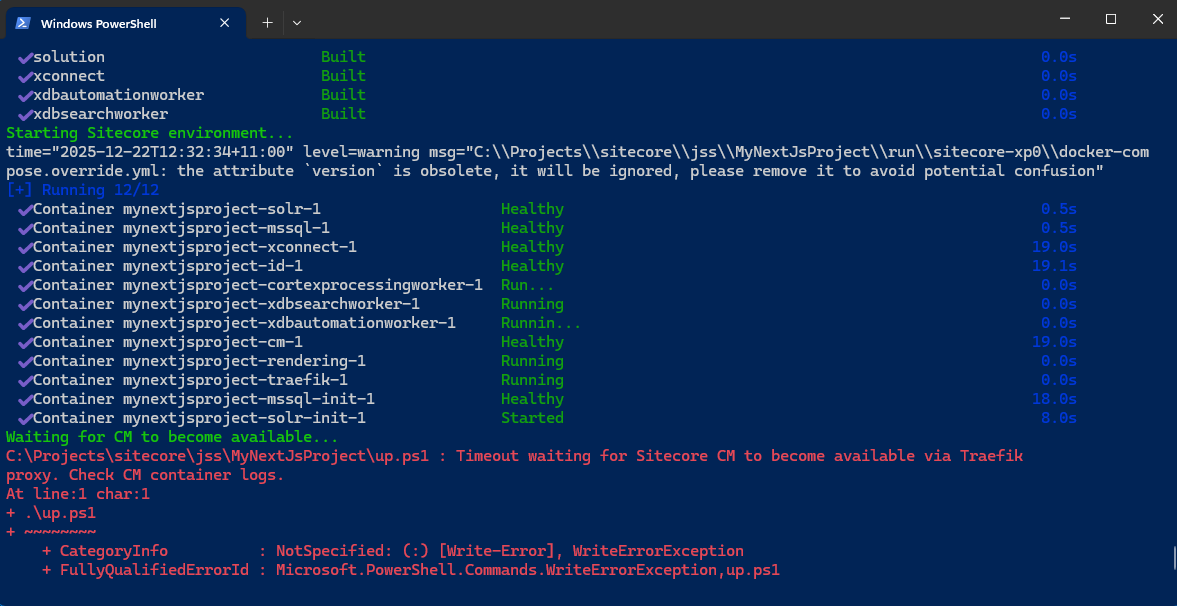
After the initialization, when I hit the .\up.ps1 command, I get below error message.
Waiting for CM to become available...
C:\Projects\sitecore\jss\MyNextJsProject\up.ps1 : Timeout waiting for Sitecore CM to become available via Traefik
proxy. Check CM container logs.
At line:1 char:1
+ .\up.ps1
+ ~~~~~~~~
    + CategoryInfo          : NotSpecified: (:) [Write-Error], WriteErrorException
    + FullyQualifiedErrorId : Microsoft.PowerShell.Commands.WriteErrorException,up.ps1
The solution
From above error message, I checked the logs in the folder \docker\data\cm. In the logs, there are errors for a solr indexes. But, I am sure from the past experience, these index error should not stop traefik proxy services to reach out to CM hosts.
This is the indication that there is something not right with the certificates needed for the ID and CM services. Checked and confirmed the valid wildcard certificates present at the path \docker\traefik\certs and that exact path is also configured correctly as volumes for the traefik service in docker-compose-override.yml
So, what is wrong now…!!!???
After few hours of debugging and googling… it turns out that the docker desktop version I am using is the culprit. The version I am using is the latest (at the time of writing this blog) 4.55.0 and the recommended version is 4.40.
I downgraded to the Docker Desktop 4.40, rerun all the images with rerun the .\up.ps1 command and it fired up all the containers without any error.
Update
I did try with Docker Desktop 4.44 and it is working absolutely fine with it as well.
I come across this type of need so may time in my entire career of Sitecore Development. Where I need to find the duplicate value in item’s field. I am writing this as note to me for my own future reference. Hopping this will also help my Sitecore community.
$dictionaryItems = Get-Item -Path 'master:' -Query "/sitecore/system/Dictionary//*[@@templateid='{6D1CD897-1936-4A3A-A511-289A94C2A7B1}']" | Select-Object -Property ID, DisplayName, @{Label="DictionaryKey"; Expression= {$_['Key']}}
$uniqueCollection = $null
foreach ($item in $dictionaryItems){
    if($uniqueCollection -Contains $($item.DictionaryKey)){
        Write-Host "Duplicate Field Value found in item ID  $($item.ID)"
    }
    else{
        $uniqueCollection += $item.DictionaryKey
    }
}
Recently, I am working on a bug reported by one of our tester. The issue stating none of the Coveo pages on few of the SXA websites working post upgrade of Coveo SXA module.
The Issue
The website suddenly started showing error message “The component is not available at this moment. Please contact the site administrator.” under Coveo’s Search Resources Component on the website pages.
Strangely, the same functionality(or rather I say partial design) used by other SXA website are working like charm. But only 2 websites which has whole Coveo Search functionality has been broken.
The Finding
First obvious thing I did was open the Google and search for the error message. After some time spending on reading multiple blogs and articles, I come with this link on Coveo’s articles.
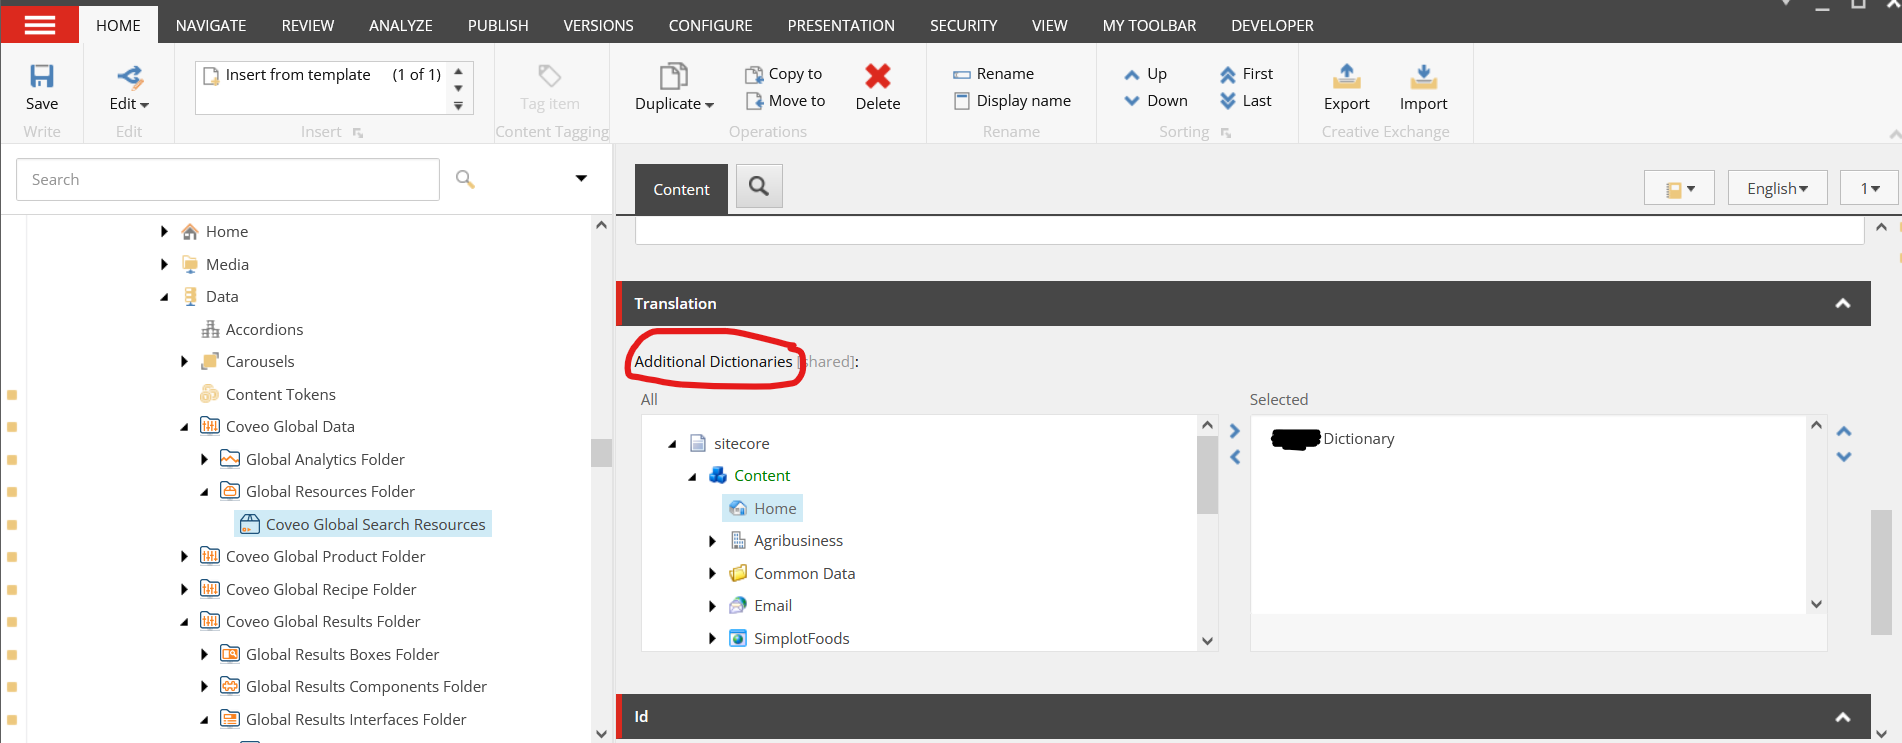
As Article suggested, I have verified both the conditions, firstly checked extranet/Anonymous(user and domain configure with Site Definition) has read access to both Sitecore/System/Dictionary items and additional dictionary item configured at the Coveo Search Resource Data source item. Secondly, checked we have correct dictionary item selected under the field Additional Dictionaries for Coveo Search Resources item configured as data source to respected UI component.
Now, I was trying to isolate the issue, to make sure the issue is due to either dictionary or its child items. So, I tried to remove the dictionary item form the additional dictionary field, publish the item and magically all the broken Coveo Pages started working…!!!
So now, I am sure there is something to do with the dictionary item for that SXA website.
The Solution
I started decoding the Coveo Search Resources SXA UI component and found the logic for getting the component properties have a validation which validates the unique dictionary keys under the selected dictionary.
This is a great lead…..!!!(it took me fair few hours of dotPeeking to find this out) That left me with great confidence that there are some dictionary entry item which has the duplicate value in the Field Key.
I did first obvious check of unique item name by turning validation rule on via Sitecore’s Content Editor’s left gutter.
But none of the dictionary entry items have duplicate name. So now, I need to relay on my Poweshell skills to find the duplicate value on Key field of item /sitecore/templates/System/Dictionary/Dictionary entry.
I removed that unwanted entry item which is lately added by one of the content editor while copying dictionary entries from older SXA website to the new one.
Recently, I am working on an upgrade project (which you must have been knowing if you read few of my recent blogs) and we encountered one very weird issue on Sitecore CM.
The Issue
After successful login to CM, the Launchpad is not showing any icons.
The Solution
First obvious thing I did was open the developer toolbar and inspected the icon image requests under the network tab and it was looking like below image.
All the request to icon images were getting HTTP500 internal server errors. Also observed that .aspx extension is being added at the end of the image extension. For example, /-/icon/LaunchPadIcons/48×48/desktop.png.aspx.
Just dig around the issue, and it turned out, we recently updated the Nuget page reference for the SharpZipLib library to the latest version 1.3.3 for one of the project in customization solution.
The OOTB(vanilla) Sitecore 10.2 also uses the same library but with different version of it.
We matched the version of ICSharpCode.SharpZipLib.dll with the version number come as Vanilla Sitecore Version 1.3.2 and magically all the icons on launch page started appearing again.
It’s been very long since, I last blog. But the wait is over and I am here with some of my learning while upgrading our Siteore platform from 9.3 to 10.2( latest and greatest). With this project, there are lots of learning and I’ll try to share it with you community.
The Issue
After deploying the customisation on top of the vanilla Sitecore 10.2 (huge applaud to Developers of Sitecore and the vibrant community to create and maintain the Docker sample repository), the first obvious step is to do a quick sanity test to check whether or not anything is broken??…. and the unexpected happens, one of the custom written pipeline code was complaining and logging errors in the CM log file.
So the next best handy tool for a developer in Dot Net world is the .Net debugger( thank God). While, I was trying to attache to w3wp process of CM container the following error appeared.
Unable to connect to the Microsoft Visual Studio Remote Debugger named 'XXX.XXX.XXX.XXX'. The Visual Studio 2022 Remote Debugger (MSVSMON.EXE) does not appear to be running on the remote computer. This may be because a firewall is preventing communication to the remote computer. Please see Help for assistance on configuring remote debugging.
The Solution
As per the error message above, it’s clear, there is something not right with the MSVSMON.EXE.
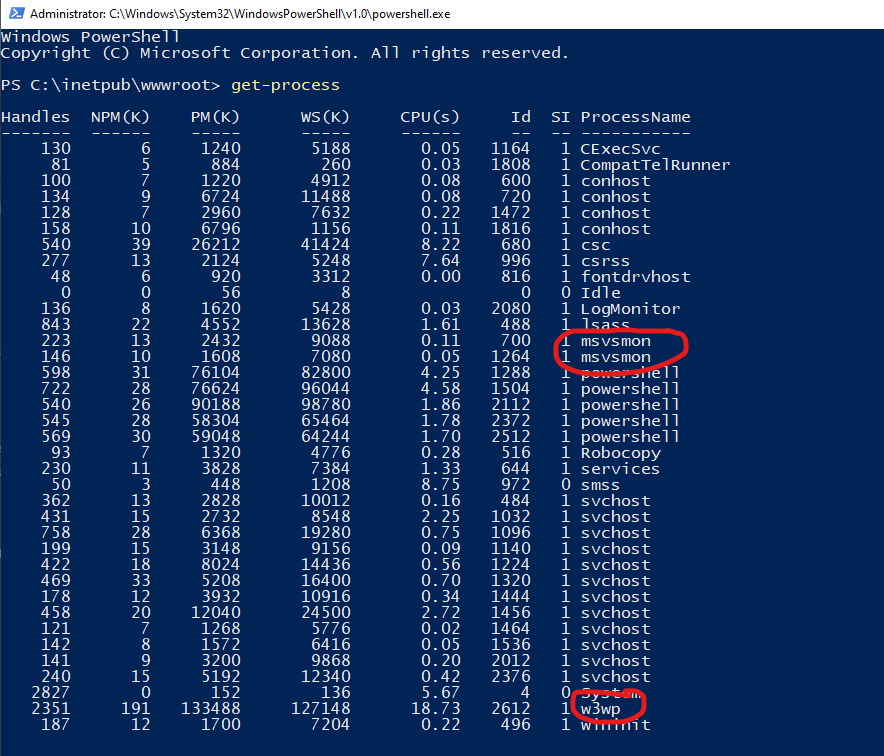
Immediately fire up following PowerShell commands to look into running processes under the CM container.
The output of the Get-Process command was not showing any currently running process with name msvsmon. uuhhhh… that is the issue, I guess…!!!
So to get the .Net remote debugging working on the CM container, I did checked how we had it working in our 9.3 sitecore Docker Environment. Found 3 different steps to get it working. I wanted to document is in my diary but did not got chance. It is never to late.
Lets have a look at those 3 steps one after another.
Step 1.
Open the docker-compose.override.yml file, add below line under the volumes
Next step to add the REMOTEDEBUGGER_PATH variable to the .env file. To do so open your .env file in VS Code or your choice of text editor and add below line to it.
Now, you need to change the path of debugger folder in above with the VS version you are using. For, now I am using VS 2022 Professional but we have some developers still using VS 2019 Professional for them the path will be C:\Program Files (x86)\Microsoft Visual Studio\2019\Professional\Common7\IDE\Remote Debugger\x64
Step 3.
Now, in the third and the final step, we will try to execute multiple processes at the entry point for CM container. To do so, I have added few commands to the existing Powershell entry point command.
With the above alteration firstly, I am writing to host to get to know that it is trying to start debugger service and secondly executing MSVSMON.EXE file with few arguments as Start-Process powershell command.
With the argument wow64port mind that each Visual Studios have their own ports assigned as default debugging port for msvsmon.exe. See the references in section below.
Verification
As verification of both w3wp and msvsmon services running we need to check the output of Get-Process command on CM container
Note
Also make sure in the web.config of your CM container, the debug is set to true for compilation node. configuration/system.web/compilation[debug=’true’]
Note
Notice that I am using (;) semicolon as the command terminator for powershell command. If you are using CMD, use & (ampersand)
Recently we have got an weird issue reported by our content authors on production. They mentioned the content are not reflected on website after they been publish or even re-publish.
First I wanted to check does the Publishing service doing all right and publishing contents correctly. Checked and it was working absolutely fine. I did switch to web database and validated recently published content. After some initial trouble shoot, discovered on CDs, the cache is not been clearing upon successful publish.
This leads my thought to suspect event queue table may have been flooded with lots of entry and may need a clean.
Did a eventqueue table cleaning as mentioned here and things did not went to normal. Still published changes were not reflecting on the website.
Now, I need to dive into detail to understand what is happening in eventqueue table.
The Properties table holds the last event execution time stamp against all the CDs.
To get that last run timestamp follow below steps:
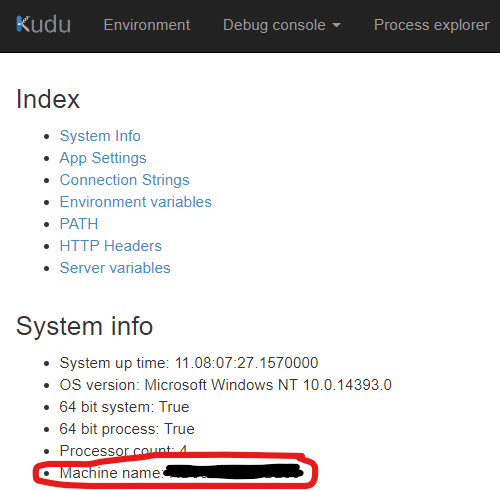
go to your web app and open the Kudu advance tool.
Navigate to Environment page from menu in header
Get the Machine Name from System Info section
Open SSMS and connect to Database
Open new query window for the database which is configured as your Event Queue database( in our case we have configured dedicated one. By default it is web)
Run below query to get the last run time stamp for that CD instance
SELECT * FROM Properties where Key LIKE '%WEB_EQSTAMP_<<MACHINENAME>>%' ORDER BY Value DESC
Replace<<MACHINENAME>> in above query with machine name from step 3 above
Depending on how may instances your selected CD is running, it will show you that may rows (by default there will be two rows for each CD. one is for Production instance and another for pre-prod instance). The value column holds the Time stamp value of last run.
Now, that we have the last run time stamp for the CD, we can get the list of all pending events for this CD instance by running below query.
SELECT * FROM EventQueue WHERE Stamp >= CONVERT(VARBINARY, <<TIMESTAMP>>) ORDER BY Created DESC
Replace the <<TIMESTAMP>> with the value from previous query.
By combining all queries together, the final query will look like below
SELECT * FROM EventQueue WHERE Stamp >=
  (
    SELECT CONVERT(VARBINARY, Value) from [Properties] where [Key] = 'WEB_EQSTAMP_<<MACHINENAME>>'
  )
  ORDER BY [Created] DESC
After all this investigation, it is clear that CD servers are not triggering remote events registered in dedicated event queue table.
Did little more investigation and found out wrong event queue configuration files has been deployed to CDs accidentally and that was causing this behavior. We placed the correct config files for dedicated event queue and the peace has been established on CD role again.
While you have a high functional developers team working on multiple Sitecore projects with same code base, it is very vital to keep the local development environment as stable and functional as possible and also keep PR short.
While achieving that stage, we came across one small issue which is intern made me to write a blog in my journal what you are reading now.
The Issue
While reviewing PRs, we observed, there is one Unicorn’s .yml file come as default to quite a few PRs. The change it has got was just few fields updated.
After quick initial investigation, found out that yml file is nothing but one of the Data Exchange Framework(DEF) batch processing item in Sitecore content tree under system node.
After bit more investigation, it turns out the sitecore’s schedule task is triggering that DEF batch process. But that raise another question, why that schduler task item is not coming as changed item list as it is also source controled using Unicorn.
The Resolution
Lets focus on the second question for now, as it has quite a quick and simple answer.
The \App_Config\Include\Unicorn\Unicorn.config has one section called <fieldFilter> which takes care of it. As few frequently value changing fields has already been excluded from being serialized (smart stuff Unicorn Developers).
That section is looking like below
<fieldFilter type="Rainbow.Filtering.ConfigurationFieldFilter, Rainbow" singleInstance="true">
					<exclude fieldID="{B1E16562-F3F9-4DDD-84CA-6E099950ECC0}" note="'Last run' field on Schedule template (used to register tasks)" />
					<exclude fieldID="{52807595-0F8F-4B20-8D2A-CB71D28C6103}" note="'__Owner' field on Standard Template" />
					<exclude fieldID="{8CDC337E-A112-42FB-BBB4-4143751E123F}" note="'__Revision' field on Standard Template" />
					<exclude fieldID="{D9CF14B1-FA16-4BA6-9288-E8A174D4D522}" note="'__Updated' field on Standard Template" />
					<exclude fieldID="{BADD9CF9-53E0-4D0C-BCC0-2D784C282F6A}" note="'__Updated by' field on Standard Template" />
					<exclude fieldID="{001DD393-96C5-490B-924A-B0F25CD9EFD8}" note="'__Lock' field on Standard Template" />
				</fieldFilter>
So now, for my initial issue to fix , I simply have to add a field I wanted to exclude form being serializedin to this fieldFilter section.
So, I created new patch configuration file (as best practice suggests) an try to patch my new exclude fields under the node <fieldFilter>. At first, I did add the config like following
<configuration xmlns:patch="http://www.sitecore.net/xmlconfig/" xmlns:role="http://www.sitecore.net/xmlconfig/role/" xmlns:environment="http://www.sitecore.net/xmlconfig/environment/">
	<sitecore role:require="Standalone or ContentManagement">
		<unicorn>
			<defaults>
				<!--
					The field filter can be used to ignore fields when comparing or serializing (i.e. don't write them to disk).
					Commonly, metadata fields such as Last Updated will be ignored to prevent SCM conflicts.
				-->
				<fieldFilter>
					<exclude patch:after="exclude[@fieldID='{001DD393-96C5-490B-924A-B0F25CD9EFD8}']" fieldID="{985BA535-0F3E-4DA8-A768-A469026DE9DB}" note="'RequestedAt' field of DEF's Pipeline Batch item" />
					<exclude patch:after="exclude[@fieldID='{001DD393-96C5-490B-924A-B0F25CD9EFD8}']" fieldID="{6A2B2CBB-4338-4814-A8A9-9FECBB90456A}" note="'LastRunFinished' field of DEF's Pipeline Batch item" />
					<exclude patch:after="exclude[@fieldID='{001DD393-96C5-490B-924A-B0F25CD9EFD8}']" fieldID="{2AA5C591-FF55-411D-96C0-978BB2C58B94}" note="'Log' field of DEF's Pipeline Batch item" />
				</fieldFilter>
			</defaults>
		</unicorn>
	</sitecore>
</configuration>
But this has weird patching when I see showconfig.appx. It actually replaces first three entries form the original xml…!!!???
I did ask God(google) and found that sitecore sometime does not patch correctly if proper attributes are not used. Someone suggest to use hint attribute to control the patching.
I did replace my patching config attribute note with the hint and eureka….!!!
This is the final configuration patch file looks like.
<configuration xmlns:patch="http://www.sitecore.net/xmlconfig/" xmlns:role="http://www.sitecore.net/xmlconfig/role/" xmlns:environment="http://www.sitecore.net/xmlconfig/environment/">
	<sitecore role:require="Standalone or ContentManagement">
		<unicorn>
			<defaults>
				<!--
					The field filter can be used to ignore fields when comparing or serializing (i.e. don't write them to disk).
					Commonly, metadata fields such as Last Updated will be ignored to prevent SCM conflicts.
				-->
				<fieldFilter>
					<exclude patch:after="exclude[@fieldID='{001DD393-96C5-490B-924A-B0F25CD9EFD8}']" fieldID="{985BA535-0F3E-4DA8-A768-A469026DE9DB}" hint="'RequestedAt' field of DEF's Pipeline Batch item" />
					<exclude patch:after="exclude[@fieldID='{001DD393-96C5-490B-924A-B0F25CD9EFD8}']" fieldID="{6A2B2CBB-4338-4814-A8A9-9FECBB90456A}" hint="'LastRunFinished' field of DEF's Pipeline Batch item" />
					<exclude patch:after="exclude[@fieldID='{001DD393-96C5-490B-924A-B0F25CD9EFD8}']" fieldID="{2AA5C591-FF55-411D-96C0-978BB2C58B94}" hint="'Log' field of DEF's Pipeline Batch item" />
				</fieldFilter>
			</defaults>
		</unicorn>
	</sitecore>
</configuration>
After this, Unicorn re-serialized the DEF pipeline batch items and happy days….!!!!
Note:
There is new feature “fieldTransforms” available in Unicorn 4.1 and later version but I have not able to get that working on my project setup. But, something worth exploring for next time.
The Sitecore has change the website development with launch of the SXA with their first release and now they have make their vision very clear about how to quickly ship the website to market via this very powerful tool.
The Issue
While working on one of the SXA website build project, I came across one strange finding. Even if you selected Bootstrap 4 as your grid system for website. There are may out of the box bootstrap css classes are missing. This leads to some investigation and found out the Sitecore SXA has ported just grid related styles(bootstrap-grid.css) to Sitecore SXA but not the full bootstrap main css(bootstrap.css)
Now, I have two questions. First, how can we add this the Sitecore SXA way without touching existing MVC layout or creating new layout? and Secondly, how can you only enable/import this to selective websites?
The Fix
After some googleing and reading few of Sitecore documents, found following steps will help get the answers to both above mentioned questions.
Create new base theme item of type /sitecore/templates/Foundation/Experience Accelerator/Theming/Base Theme under path /sitecore/media library/Base Themes (one can use insert options too). In my example I have given name bootstrap 411.
Create a Styles folder item of type /sitecore/templates/Foundation/Experience Accelerator/Theming/Folders/Styles (one can use insert option) under the newly created base theme item above.
Upload the css file to this styles folder using media upload feature. In my example I have uploaded bootstrap.css
Navigate to the site specific theme item under media library. For example, /sitecore/media library/Themes/Tenant1/Website1
In the Base Themes multi-select link field select the newly created base theme item in step 1 above
Publish all newly created items in step 1 and 2
Publish altered website specific theme item
Verification
New styles should work if the newly added stylesheet render on the page. To verify style link is render on website page or not we need to turn The Asset Optimizer off for the site (by default this is on and if it is already turned off you can skip these steps)
In the Content Editor, navigate to sitecore/content/<Tenant>/<Website>/Presentation/Page Designs.
In the Asset Optimization section, in the Styles Optimizing Enabled and Scripts Optimizing Enabled fields, to override styles and scripts optimization settings, select:
Default – to inherit global settings.
Yes – to always enable optimization for this site.
No – to always disable optimization for this site.
3. Publish the Page Design Item
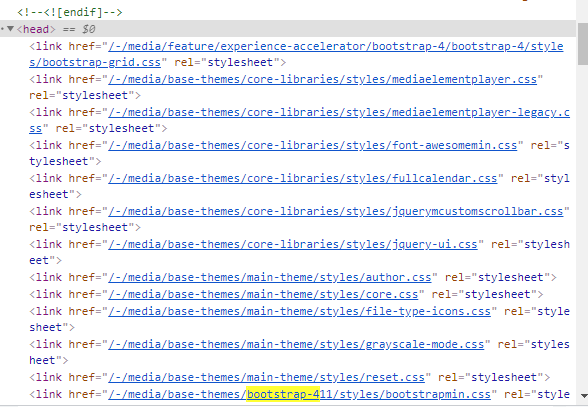
4. Navigate to the web application in the browser and open the page view source and look for the newly created item path in the head section. In my example, looking for bootstrap-411(don’t mind the hyphen as it is due to link manager options settings)
While working on the integrating Sitecore’s CM’s functionality with third party Digital Asset Management(DAM) system, I came across one interesting issue where I wanted my container applications to run on https.
The Issue
After integrating the third party DAM with Sitecore CMS, it found out that, while using local website on developer machine, the developer is not able to load the SSO login page. While loading that page below error messages logged in browser’s console.
Access to the WebCrypto API is restricted to secure origins. Compact View requires HTTPS when used outside localhost (for development).
As clearly stated I am not using localhost as host to access my cm and seems like CM needs to be securely severed over https where as we, for local development, use non secure protocol http.
The Fix
The solution is simple looking form 35,000 feet. Needs CM urls to be serving content over the secure HTTPS protocol. But when actually started digging in details, it is fun and very learning experience.
Performed following steps to achieve this on our local docker development environment.
Open the startup/createcert.ps1 for editing and change following parameter’s default value
$certificatepassword – from b to more secured passowrd string
$dnsNameList – by default the value is *.dev.local. Change this value to match your host pattern. You can specify individual host comma(,) separated.
Note
Alternatively, you can can pass those two as parameter while firing createcert.ps1 command.
3. Open docker-compose.yml file and navigate to cm service and perform following changes:
Add new environment parameter HOST_HEADER and set cm host value to it. If you have multiple host(this is what in my case), specify them semicolon(;) separated list. For example host1.dev.local;host2.dev.local
Under the volumes bind the new volume for folder startup to c:\startup path of container.
Under the port bind the https’s default secure port 443 with the next available container port
Note
The container host port needs to be new port which is not been use by any other services.
Lastly, change the entypoint to the path of startup.ps1 file under the startup folder bound under the volumes in above step for startup folder.
After all above changes to CM service of docker-compose.yml file will look something like below
4. Copy folder startup and it’s content to same folder where your docker-compose.yml file is.
5. Open the powershell in elevated mode and execute following command
PS> cd <<docker-compose.yml file's folder path>>
PS> ./startup/createcert.ps1
Above powershell script will generate three files cert.cer, cert.pfx and cert.password.text under the startup folder.
This command will also generate the self-signed wildcard certificate and install to your system’s local certificate store under personal.
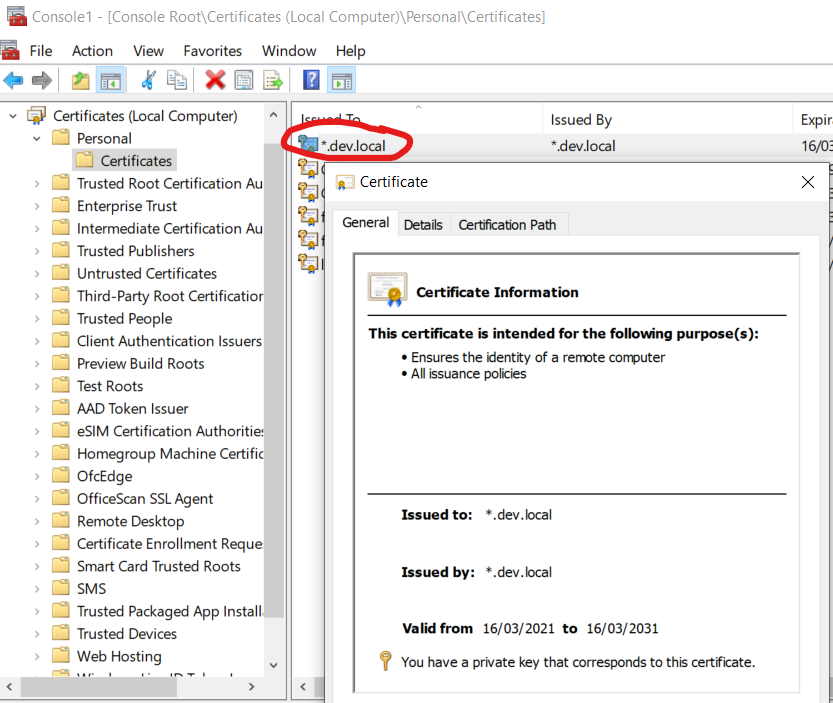
To verify that run mmc and open local computer certificate store.
Self signed wildcard certificate for *.dev.local
6. Now, is the time to fire up the container for sitecore. To do so run following docker compose command
PS> docker-compose up -d
After successful execution the container services will be up and one can access the host binding with https. For example https://cm.dev.local in this case.
Advance trouble shooting
To check the certificate is exist after the createcert.ps1 script execution. This command can be run on both your local and against cm container as well.
This is going to be a short blog for fixing issue I came across while working on custom pipeline creation and execution for Sitecore’s Data Exchange Framework(DEF or DxF).
The issue
While the Pipeline Batch item is selected, buttons on DATA EXCHANGE toolbar at top does not behave how they should.
Immediately after selecting pipeline item, I noticed all buttons in ribbon is visible and clickable. Secondly, clicking on Run Pipeline Batch Button does not works. I was neither starting execution of pipeline nor displaying any visible error messages. See below image for more details:
The fix
I started investigation and collecting events what could have done the damage. Found that before last deployment it was behaving the way it should be. Huuummm… that’s good hint, isn’t it? The last release just deployed files to CMS server. This is soothing to my ears as investment scope is drastically reduced to files. The content automatically gone out of equation.
To fix this, I tried install DEF SDK package first with just deploying file artifacts and skipping any content installation.
Unfortunately, that does not work ….!!! 😦
Next best bet is obvious and try to re-install the DEF framework package with deploying files only.
And that does the trick ….!!!! (Dance)
Update:
The file \App_Config\Sitecore\DataExchange\Sitecore.DataExchange.Local.config was missing. Placing this file from Package has actually fixed the issue.
Happy Data Sync and import using Sitecore Data Exchange Framework. 🙂