Event Queue Trouble shooting


Recently we have got an weird issue reported by our content authors on production. They mentioned the content are not reflected on website after they been publish or even re-publish.

First I wanted to check does the Publishing service doing all right and publishing contents correctly. Checked and it was working absolutely fine. I did switch to web database and validated recently published content. After some initial trouble shoot, discovered on CDs, the cache is not been clearing upon successful publish.

This leads my thought to suspect event queue table may have been flooded with lots of entry and may need a clean.

Did a eventqueue table cleaning as mentioned here and things did not went to normal. Still published changes were not reflecting on the website.

Now, I need to dive into detail to understand what is happening in eventqueue table.

The Properties table holds the last event execution time stamp against all the CDs.

To get that last run timestamp follow below steps:

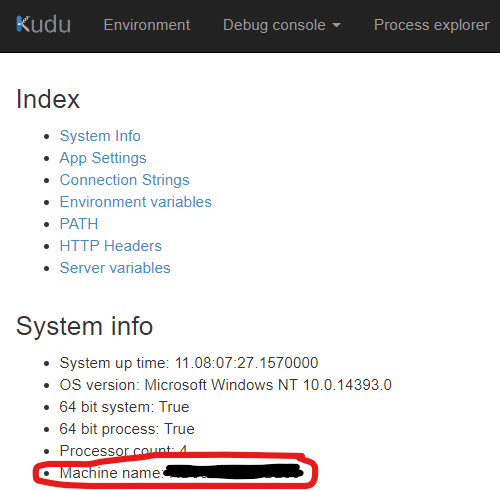
  1. go to your web app and open the Kudu advance tool.
  2. Navigate to Environment page from menu in header
  3. Get the Machine Name from System Info section
  1. Open SSMS and connect to Database
  2. Open new query window for the database which is configured as your Event Queue database( in our case we have configured dedicated one. By default it is web)
  3. Run below query to get the last run time stamp for that CD instance
SELECT * FROM Properties where Key LIKE '%WEB_EQSTAMP_<<MACHINENAME>>%' ORDER BY Value DESC
  1. Replace<<MACHINENAME>> in above query with machine name from step 3 above

Depending on how may instances your selected CD is running, it will show you that may rows (by default there will be two rows for each CD. one is for Production instance and another for pre-prod instance). The value column holds the Time stamp value of last run.

Now, that we have the last run time stamp for the CD, we can get the list of all pending events for this CD instance by running below query.

  SELECT * FROM EventQueue WHERE Stamp >= CONVERT(VARBINARY, <<TIMESTAMP>>) ORDER BY Created DESC

Replace the <<TIMESTAMP>> with the value from previous query.

By combining all queries together, the final query will look like below

SELECT * FROM EventQueue WHERE Stamp >= 
  (
    SELECT CONVERT(VARBINARY, Value) from [Properties] where [Key] = 'WEB_EQSTAMP_<<MACHINENAME>>'
  )
  ORDER BY [Created] DESC

After all this investigation, it is clear that CD servers are not triggering remote events registered in dedicated event queue table.

Did little more investigation and found out wrong event queue configuration files has been deployed to CDs accidentally and that was causing this behavior. We placed the correct config files for dedicated event queue and the peace has been established on CD role again.

Happy Event queue trouble shooting…!!!

References

Advertisement

Sitecore Unicorn Exclude Fields


While you have a high functional developers team working on multiple Sitecore projects with same code base, it is very vital to keep the local development environment as stable and functional as possible and also keep PR short.

While achieving that stage, we came across one small issue which is intern made me to write a blog in my journal what you are reading now.

The Issue

While reviewing PRs, we observed, there is one Unicorn’s .yml file come as default to quite a few PRs. The change it has got was just few fields updated.

After quick initial investigation, found out that yml file is nothing but one of the Data Exchange Framework(DEF) batch processing item in Sitecore content tree under system node.

After bit more investigation, it turns out the sitecore’s schedule task is triggering that DEF batch process. But that raise another question, why that schduler task item is not coming as changed item list as it is also source controled using Unicorn.

The Resolution

Lets focus on the second question for now, as it has quite a quick and simple answer.

The \App_Config\Include\Unicorn\Unicorn.config has one section called <fieldFilter> which takes care of it. As few frequently value changing fields has already been excluded from being serialized (smart stuff Unicorn Developers).

That section is looking like below

<fieldFilter type="Rainbow.Filtering.ConfigurationFieldFilter, Rainbow" singleInstance="true">
					<exclude fieldID="{B1E16562-F3F9-4DDD-84CA-6E099950ECC0}" note="'Last run' field on Schedule template (used to register tasks)" />
					<exclude fieldID="{52807595-0F8F-4B20-8D2A-CB71D28C6103}" note="'__Owner' field on Standard Template" />
					<exclude fieldID="{8CDC337E-A112-42FB-BBB4-4143751E123F}" note="'__Revision' field on Standard Template" />
					<exclude fieldID="{D9CF14B1-FA16-4BA6-9288-E8A174D4D522}" note="'__Updated' field on Standard Template" />
					<exclude fieldID="{BADD9CF9-53E0-4D0C-BCC0-2D784C282F6A}" note="'__Updated by' field on Standard Template" />
					<exclude fieldID="{001DD393-96C5-490B-924A-B0F25CD9EFD8}" note="'__Lock' field on Standard Template" />
				</fieldFilter>

So now, for my initial issue to fix , I simply have to add a field I wanted to exclude form being serializedin to this fieldFilter section.

So, I created new patch configuration file (as best practice suggests) an try to patch my new exclude fields under the node <fieldFilter>. At first, I did add the config like following

<configuration xmlns:patch="http://www.sitecore.net/xmlconfig/" xmlns:role="http://www.sitecore.net/xmlconfig/role/" xmlns:environment="http://www.sitecore.net/xmlconfig/environment/">
	<sitecore role:require="Standalone or ContentManagement">
		<unicorn>
			<defaults>
				<!--
					The field filter can be used to ignore fields when comparing or serializing (i.e. don't write them to disk).
					Commonly, metadata fields such as Last Updated will be ignored to prevent SCM conflicts.
				-->
				<fieldFilter>
					<exclude patch:after="exclude[@fieldID='{001DD393-96C5-490B-924A-B0F25CD9EFD8}']" fieldID="{985BA535-0F3E-4DA8-A768-A469026DE9DB}" note="'RequestedAt' field of DEF's Pipeline Batch item" />
					<exclude patch:after="exclude[@fieldID='{001DD393-96C5-490B-924A-B0F25CD9EFD8}']" fieldID="{6A2B2CBB-4338-4814-A8A9-9FECBB90456A}" note="'LastRunFinished' field of DEF's Pipeline Batch item" />
					<exclude patch:after="exclude[@fieldID='{001DD393-96C5-490B-924A-B0F25CD9EFD8}']" fieldID="{2AA5C591-FF55-411D-96C0-978BB2C58B94}" note="'Log' field of DEF's Pipeline Batch item" />
				</fieldFilter>
			</defaults>
		</unicorn>
	</sitecore>
</configuration>

But this has weird patching when I see showconfig.appx. It actually replaces first three entries form the original xml…!!!???

I did ask God(google) and found that sitecore sometime does not patch correctly if proper attributes are not used. Someone suggest to use hint attribute to control the patching.

I did replace my patching config attribute note with the hint and eureka….!!!

This is the final configuration patch file looks like.

<configuration xmlns:patch="http://www.sitecore.net/xmlconfig/" xmlns:role="http://www.sitecore.net/xmlconfig/role/" xmlns:environment="http://www.sitecore.net/xmlconfig/environment/">
	<sitecore role:require="Standalone or ContentManagement">
		<unicorn>
			<defaults>
				<!--
					The field filter can be used to ignore fields when comparing or serializing (i.e. don't write them to disk).
					Commonly, metadata fields such as Last Updated will be ignored to prevent SCM conflicts.
				-->
				<fieldFilter>
					<exclude patch:after="exclude[@fieldID='{001DD393-96C5-490B-924A-B0F25CD9EFD8}']" fieldID="{985BA535-0F3E-4DA8-A768-A469026DE9DB}" hint="'RequestedAt' field of DEF's Pipeline Batch item" />
					<exclude patch:after="exclude[@fieldID='{001DD393-96C5-490B-924A-B0F25CD9EFD8}']" fieldID="{6A2B2CBB-4338-4814-A8A9-9FECBB90456A}" hint="'LastRunFinished' field of DEF's Pipeline Batch item" />
					<exclude patch:after="exclude[@fieldID='{001DD393-96C5-490B-924A-B0F25CD9EFD8}']" fieldID="{2AA5C591-FF55-411D-96C0-978BB2C58B94}" hint="'Log' field of DEF's Pipeline Batch item" />
				</fieldFilter>
			</defaults>
		</unicorn>
	</sitecore>
</configuration>

After this, Unicorn re-serialized the DEF pipeline batch items and happy days….!!!!

Note:

There is new feature “fieldTransforms” available in Unicorn 4.1 and later version but I have not able to get that working on my project setup. But, something worth exploring for next time.

References

Sitecore Publishing Service – Part 3 – Advance Configurations


So far in Part – 1 and Part – 2 of this series, the Sitecore Publishing Service up & running in Azure PaaS and the Sitecore Publishing module is installed & configured.

This last part will trying to address few additional scenarios with publishing service. Scenarios like, the Sitecore databases are hosted in Azure SQL and Sitecore implementation have multiple publishing targets.

Sitecore database in Azure(Azure SQL)

If publishing service hosted on Azure web app and the databases are also in Azure SQL Database, there are few additional configurations needed for the service to work seamlessly with bigger publishing payload.

Follow below steps to configure publishing service for Azure Environment

  • Navigate to \configurations\system.webServer\aspNetCore node in wwwRoot\web.config file of publishing service in app service.
  • replace the arguments attribute with the following
arguments=" --environment azure"
  • Save the web.config
  • Stop and start app service

By default Sitecore publishing service is running under the “production” environment and that patches the configurations for production. After above change, service will start with Azure environment and it will patch azure environment specific configurations.

  • Navigate to wwwroot/config/azure
  • rename file sc.publishing.sqlazure.connections.xml.example to sc.publishing.sqlazure.connections.xml. Remove .example extension and make sure it has .xml extension.

New publishing target…!!!???

If other than default Internet publishing target is being used in CMS, there are few additional configurations needs to be made. So lets have a look at those.

I am assuming the additional publishing target also linked to additional database other than default web database. If so, the new connection string also needs to be added to publishing service.

New connection string

In this scenario, will take example of new web database in Azure SQL US region and need to add new target to publish content to web database to this US region.

  • Add new connection string to Publishing service. lets name it web_us
Sitecore.Framework.Publishing.Host configuration setconnectionstring web_us "<US web database connection string>"

/config/sitecore/publishing/sc.publishing.xml

Open above file and follow below steps:

  • navigate to Settings\Sitecore\Publishing\Services\DefaultConnectionFactory\Options\Connections
  • Search for the child node Internet, duplicate the whole node along with children. For example, name it InternetUS
  • Within that InternetUS node navigate to child node ConnectionString and change the value of the node to following to match the name of the connection sting in steps above.
${Sitecore:Publishing:ConnectionStrings:web_us}
  • Navigate to Settings\Sitecore\Publishing\Services\StoreFactory\Options\Stores\Targets
  • Search for the child node Internet, duplicate the whole node along with children. For example, name it InternetUS
  • Change the value of the ConnectionName to InternetUs. This must match the name of the name of the new node name under Settings\Sitecore\Publishing\Services\DefaultConnectionFactory\Options\Connections. Created in one of the step above.
  • Set the id of new Publishing Target item in Sitecore CMS. For example,
<Id>46FDC9AF-3F00-4D55-BDB8-86ED13F82E00</Id>
  • Set the value of child node ScDatabase to newly added databsae name. In our example it would be web_us.
  • Save the file

wwwroot/config/azure/sc.publishing.sqlazure.connections.xml

Note

This step is optional if the service is not using databases on Azure SQL.
  • Navigate to Settings\Sitecore\Publishing\Services\DefaultConnectionFactory\options\Connections\
  • Search for Internet node in child nodes and duplicate that node with name InternetUS along with child nodes
  • Save File

Bonus

Log level changing for debugging

Nothing can beat detailed level logging while debugging application/service. Default publishing service have two filters one sitecore and anther is default.

For sitecore filter the default log level is set to Information and default log level is set to Warning. See below xml for the same.

<Filters>
    <Sitecore>Information</Sitecore>
    <Default>Warning</Default>
</Filters>

One can select log filter level to one of the following:

  • Trace : The most detailed log messages, may contain sensitive application data. These messages are disabled by default and should never be enabled in a production environment.
  • Debug : Logs that are used for interactive investigation during development should use the Debug level. These logs should primarily contain information useful for debugging and have no long-term value.
  • Information : Track the general flow of the application using logs at the Information level. These logs should have value in the long term.
  • Warning : Warnings should highlight an abnormal or unexpected event in the application flow. This event does not cause the application execution to stop, but can signify sub-optimal performance or a potential problem for the future.
  • Error : An error should be logged when the current flow of execution is stopped due to a failure. These should indicate a failure in the current activity, not an application-wide failure. These will mainly be unhandled exceptions and recoverable failures.
  • Critical : A critical log should describe an unrecoverable application or system crash, or a catastrophic failure that requires immediate attention.

To overwrite these default log level filters, use wwwroot/config/sitecore/sc.logging.xml file.

Note

The Development environment mode sets the Sitecore log level filter to Debug. So the service can be run under Development Environment for more detailed logging.

After all these configuration changes restart the publishing service.

Have a happy performing Sitecore publishing…!!!!

Sitecore Active Directory Configuration: Read User Data from AD Group


The problem:

while working on the Allowing access to the organization’s users as Content Author on the Sitecore CM server using Sitecore’s Active Directory(AD) Module, we encounter very strange issue of not able to read user data from the AD user group. So the idea is to enable group of employees in organization to grant access to the CMS server to do the content authoring duties and enable their windows credential to get access to the Sitecore CMS.

In other words Sitecore’s User Manager wasn’t displaying user from active directory group.

Steps to reproduce issue/problem

  1. Install Sitecore’s Active Directory Module from here.
  2. Configure AD connection string to point to a logical group in the active directory structure.
    <connectionStrings>
        <add name="ManagersConnString" connectionString="LDAP://testsrv/OU=Managers,DC=testdomain,DC=sitecore,DC=net" />
    </connectionStrings>
    
  3. Configuring the ASP.NET Security Providers(Membership Provider)
     <add name="ad"
     type="LightLDAP.SitecoreADMembershipProvider"
     connectionStringName="AD"
     applicationName="sitecore"
     minRequiredPasswordLength="1"
     minRequiredNonalphanumericCharacters="0"
     requiresQuestionAndAnswer="false"
     requiresUniqueEmail="false"
     connectionUsername="[put the username here]"
     connectionPassword="[put the password here]"
     connectionProtection="Secure"
     attributeMapUsername="sAMAccountName"
     enableSearchMethods="true" />
  4. Activating Switching Providers

In web.config file, in <system.web> section, browse for <membership> element and find the provider called sitecore and set its realProviderName attribute to switcher.

<membership defaultProvider="sitecore" hashAlgorithmType="SHA1">
    <providers>
        <clear/>
        <add name="sitecore" type="Sitecore.Security.SitecoreMembershipProvider, Sitecore.Kernel" realProviderName="<strong>switcher</strong>" providerWildcard="%" raiseEvents="true"/>
        <add name="sql" type="System.Web.Security.SqlMembershipProvider" connectionStringName="core" applicationName="sitecore" minRequiredPasswordLength="1" minRequiredNonalphanumericCharacters="0" requiresQuestionAndAnswer="false" requiresUniqueEmail="false" maxInvalidPasswordAttempts="256"/>
        <add name="switcher" type="Sitecore.Security.SwitchingMembershipProvider, Sitecore.Kernel" applicationName="sitecore" mappings="switchingProviders/membership"/>
    </providers>
</membership>
  1. Open Sitecore’s User Manager Check the user listed from AD.

Here we are just interesting in getting the users from the Active Directory not the Roles. But you can extent Sitecore Securities to get the roles and the some of the additional User related data using configuring Role Manager and Profile Provider settings.

Root Cause

There are no actual user data present under the AD group. we have checked that, if you change the connection string to the node in the AD tree which contains the actual user under it will work. But if you are trying to point your AD connection to a Logical Group it won’t work.

Solution :
While dealing with the AD most of the time we have great difficulty to see and check what’s the structure and values of element/user properties.
For that I personally recommend the simple ans easy to use tool called “AD Explorer”. It is free and handy tool which gives you the graphical representation of you AD tree and also helps you to find the correct connection string.

It’s free tool and you can download it from https://technet.microsoft.com/en-us/library/bb963907.aspx

AD Explorer for Group

  1. Step 1

Change the connection string to point to the parent node of the logical group.

<connectionStrings>
    <add name="ManagersConnString" connectionString="LDAP://testsrv/DC=testdomain,DC=sitecore,DC=net" />
</connectionStrings>
  1. Step 2

In the system.web/membership/providers add the attribute customFilter for the “AD” node as shown in below configuration done in step 2 in reproduction steps above.

<add name="ad"
type="LightLDAP.SitecoreADMembershipProvider"
connectionStringName="AD"
applicationName="sitecore"
minRequiredPasswordLength="1"
minRequiredNonalphanumericCharacters="0"
requiresQuestionAndAnswer="false"
requiresUniqueEmail="false"
connectionUsername="[put the username here]"
connectionPassword="[put the password here]"
connectionProtection="Secure"
attributeMapUsername="sAMAccountName"
enableSearchMethods="true"
customFilter="(memberOf=CN=Managers,DC=testdomain,DC=sitecore,DC=net)" />

Once it is all done, Open Sitecore’s User Manager and check there are users listed from AD. It would be looks like image below.

User Manager with AD Users


Happy Active Directory Configuration 🙂