I come across this type of need so may time in my entire career of Sitecore Development. Where I need to find the duplicate value in item’s field. I am writing this as note to me for my own future reference. Hopping this will also help my Sitecore community.
$dictionaryItems = Get-Item -Path 'master:' -Query "/sitecore/system/Dictionary//*[@@templateid='{6D1CD897-1936-4A3A-A511-289A94C2A7B1}']" | Select-Object -Property ID, DisplayName, @{Label="DictionaryKey"; Expression= {$_['Key']}}
$uniqueCollection = $null
foreach ($item in $dictionaryItems){
    if($uniqueCollection -Contains $($item.DictionaryKey)){
        Write-Host "Duplicate Field Value found in item ID  $($item.ID)"
    }
    else{
        $uniqueCollection += $item.DictionaryKey
    }
}
It’s been very long since, I last blog. But the wait is over and I am here with some of my learning while upgrading our Siteore platform from 9.3 to 10.2( latest and greatest). With this project, there are lots of learning and I’ll try to share it with you community.
The Issue
After deploying the customisation on top of the vanilla Sitecore 10.2 (huge applaud to Developers of Sitecore and the vibrant community to create and maintain the Docker sample repository), the first obvious step is to do a quick sanity test to check whether or not anything is broken??…. and the unexpected happens, one of the custom written pipeline code was complaining and logging errors in the CM log file.
So the next best handy tool for a developer in Dot Net world is the .Net debugger( thank God). While, I was trying to attache to w3wp process of CM container the following error appeared.
Unable to connect to the Microsoft Visual Studio Remote Debugger named 'XXX.XXX.XXX.XXX'. The Visual Studio 2022 Remote Debugger (MSVSMON.EXE) does not appear to be running on the remote computer. This may be because a firewall is preventing communication to the remote computer. Please see Help for assistance on configuring remote debugging.
The Solution
As per the error message above, it’s clear, there is something not right with the MSVSMON.EXE.
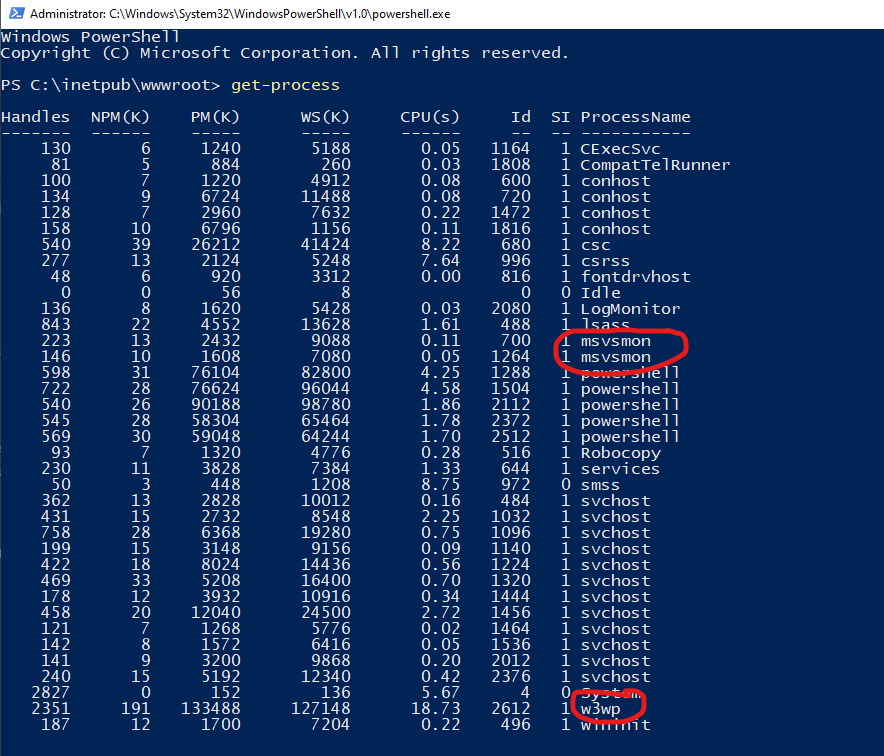
Immediately fire up following PowerShell commands to look into running processes under the CM container.
The output of the Get-Process command was not showing any currently running process with name msvsmon. uuhhhh… that is the issue, I guess…!!!
So to get the .Net remote debugging working on the CM container, I did checked how we had it working in our 9.3 sitecore Docker Environment. Found 3 different steps to get it working. I wanted to document is in my diary but did not got chance. It is never to late.
Lets have a look at those 3 steps one after another.
Step 1.
Open the docker-compose.override.yml file, add below line under the volumes
Next step to add the REMOTEDEBUGGER_PATH variable to the .env file. To do so open your .env file in VS Code or your choice of text editor and add below line to it.
Now, you need to change the path of debugger folder in above with the VS version you are using. For, now I am using VS 2022 Professional but we have some developers still using VS 2019 Professional for them the path will be C:\Program Files (x86)\Microsoft Visual Studio\2019\Professional\Common7\IDE\Remote Debugger\x64
Step 3.
Now, in the third and the final step, we will try to execute multiple processes at the entry point for CM container. To do so, I have added few commands to the existing Powershell entry point command.
With the above alteration firstly, I am writing to host to get to know that it is trying to start debugger service and secondly executing MSVSMON.EXE file with few arguments as Start-Process powershell command.
With the argument wow64port mind that each Visual Studios have their own ports assigned as default debugging port for msvsmon.exe. See the references in section below.
Verification
As verification of both w3wp and msvsmon services running we need to check the output of Get-Process command on CM container
Note
Also make sure in the web.config of your CM container, the debug is set to true for compilation node. configuration/system.web/compilation[debug=’true’]
Note
Notice that I am using (;) semicolon as the command terminator for powershell command. If you are using CMD, use & (ampersand)
While working on the integrating Sitecore’s CM’s functionality with third party Digital Asset Management(DAM) system, I came across one interesting issue where I wanted my container applications to run on https.
The Issue
After integrating the third party DAM with Sitecore CMS, it found out that, while using local website on developer machine, the developer is not able to load the SSO login page. While loading that page below error messages logged in browser’s console.
Access to the WebCrypto API is restricted to secure origins. Compact View requires HTTPS when used outside localhost (for development).
As clearly stated I am not using localhost as host to access my cm and seems like CM needs to be securely severed over https where as we, for local development, use non secure protocol http.
The Fix
The solution is simple looking form 35,000 feet. Needs CM urls to be serving content over the secure HTTPS protocol. But when actually started digging in details, it is fun and very learning experience.
Performed following steps to achieve this on our local docker development environment.
Open the startup/createcert.ps1 for editing and change following parameter’s default value
$certificatepassword – from b to more secured passowrd string
$dnsNameList – by default the value is *.dev.local. Change this value to match your host pattern. You can specify individual host comma(,) separated.
Note
Alternatively, you can can pass those two as parameter while firing createcert.ps1 command.
3. Open docker-compose.yml file and navigate to cm service and perform following changes:
Add new environment parameter HOST_HEADER and set cm host value to it. If you have multiple host(this is what in my case), specify them semicolon(;) separated list. For example host1.dev.local;host2.dev.local
Under the volumes bind the new volume for folder startup to c:\startup path of container.
Under the port bind the https’s default secure port 443 with the next available container port
Note
The container host port needs to be new port which is not been use by any other services.
Lastly, change the entypoint to the path of startup.ps1 file under the startup folder bound under the volumes in above step for startup folder.
After all above changes to CM service of docker-compose.yml file will look something like below
4. Copy folder startup and it’s content to same folder where your docker-compose.yml file is.
5. Open the powershell in elevated mode and execute following command
PS> cd <<docker-compose.yml file's folder path>>
PS> ./startup/createcert.ps1
Above powershell script will generate three files cert.cer, cert.pfx and cert.password.text under the startup folder.
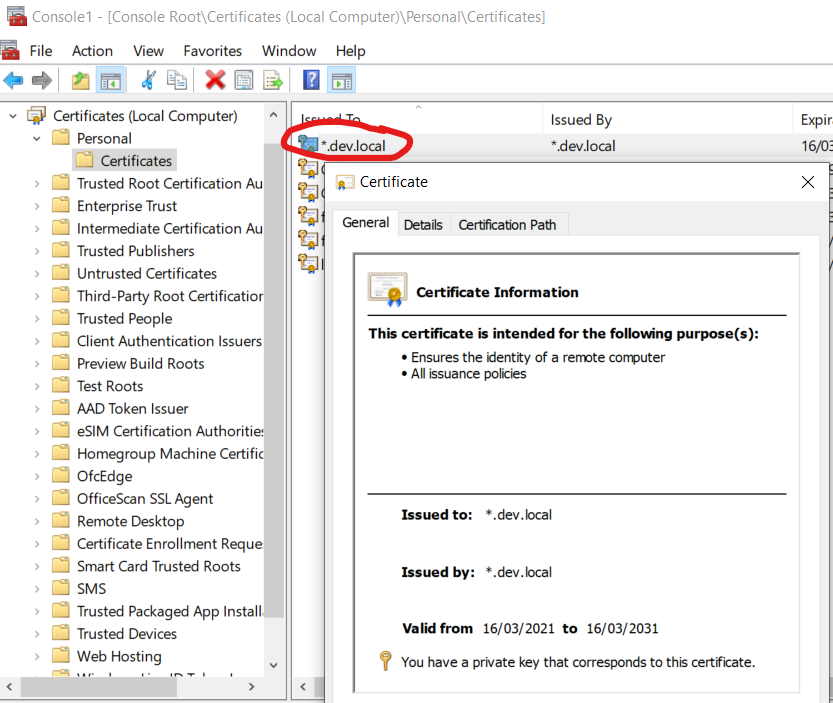
This command will also generate the self-signed wildcard certificate and install to your system’s local certificate store under personal.
To verify that run mmc and open local computer certificate store.
Self signed wildcard certificate for *.dev.local
6. Now, is the time to fire up the container for sitecore. To do so run following docker compose command
PS> docker-compose up -d
After successful execution the container services will be up and one can access the host binding with https. For example https://cm.dev.local in this case.
Advance trouble shooting
To check the certificate is exist after the createcert.ps1 script execution. This command can be run on both your local and against cm container as well.
The QA team, we are working with has raised a very interesting issue while testing newly created data report using Sitecore Poershell Extenstion(SPE).
The Issue
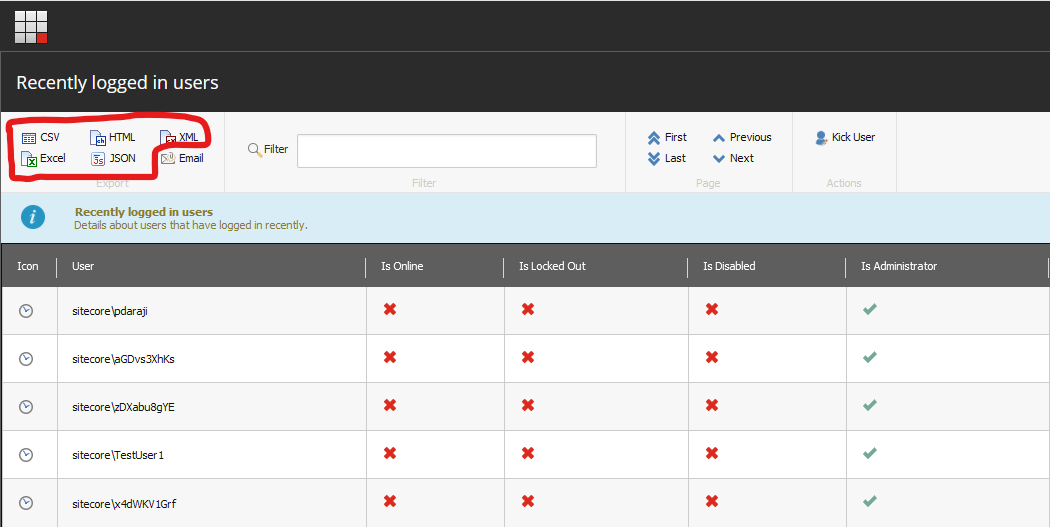
The data report was executing perfectly but while trying to export the data in any of pre-defined formats offered by SPE, it was not working.
The Sitecore Powershell is allowing export of report data in various industrial standard formats out of the box as listed below:
CSV
HTML
XML
Excel
JSON
These formats have option links in the ribbon above but when clicking, none of those producing any output.
¯\_(ツ)_/¯
The Investigation
First step is to try to reproduce the issue. We tried on all the available environments and it is happening on every environment except for the local environment.
I though the issue may have to do with some missing config or SPE. So, we quickly try to re-install the SPE module on CM with no over-write option for both files and content on Integration Environment. But that does not fix the issue. ☹
So, we started listing what are the major difference from modules and features point of view between local development and other environments on Azure. It turns out that all other environments have exactly the same piece of code, configurations and modules installed except for Federated Authentication using Sitecore Identity Server for CM.
The Fix
We did quick search over the internet and one of my colleague found out that there is one file which is disabled for SPE which needs to be enable if we are using sitecore 9.1 and higher(we are running 9.3) along with identity server.
The file needs to be enabled is Spe.IdentityServer.config file which is part of the SPE package.
Once package is installed, the file is located at path <<website Root>>\App_Config\Include\Spe\Spe.IdentityServer.config.disabled. The content of this disabled file is as below.
<configuration xmlns:patch="http://www.sitecore.net/xmlconfig/" xmlns:role="http://www.sitecore.net/xmlconfig/role/" xmlns:security="http://www.sitecore.net/xmlconfig/security/">
  <sitecore role:require="Standalone or ContentManagement" security:require="Sitecore">
    <pipelines>
      <owin.cookieAuthentication.validateIdentity>
        <processor type="Sitecore.Owin.Authentication.Pipelines.CookieAuthentication.ValidateIdentity.ValidateSiteNeutralPaths, Sitecore.Owin.Authentication">
          <siteNeutralPaths hint="list">
            <!-- This entry corrects the infinite loop of ExecuteCommand in the SPE Console -->
            <path hint="spe">/sitecore%20modules/PowerShell</path>
          </siteNeutralPaths>
        </processor>
      </owin.cookieAuthentication.validateIdentity>
    </pipelines>
  </sitecore>
</configuration>
Tip: The best way to get these config enable in Docker container world, is to leave the above mentioned .disabled file as is. Create new configuration file with above content in Visual Studio solution deploying to z folder under app_config\include on your binding volume path which will be taken care by Sitecore config patching.
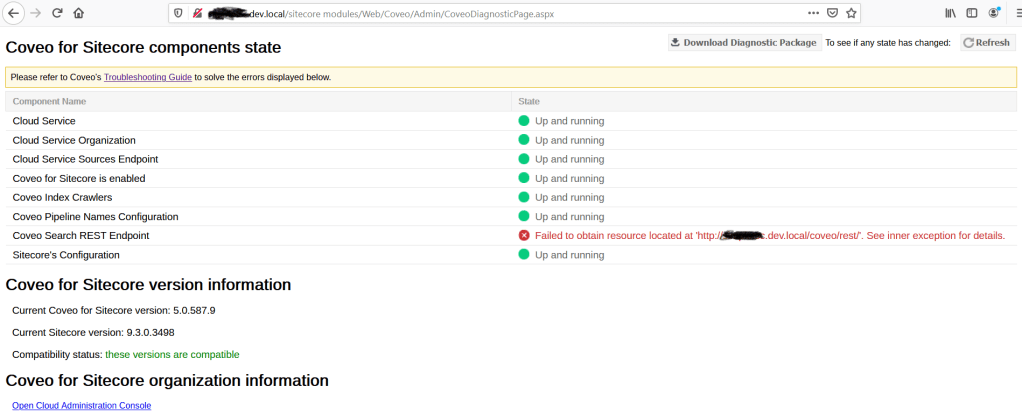
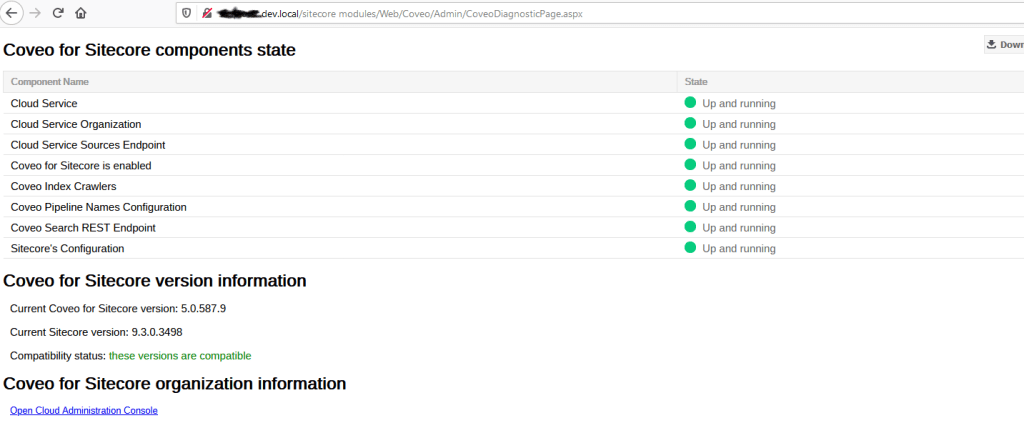
While configuring Coveo search on my local development environment using Docker, something got my attention on Coveo’s diagnosis page(<<Sitecore CM Host>>/sitecore modules/Web/Coveo/Admin/CoveoDiagnosticPage.aspx).
This page has all the green ticks except for the one. This is Coveo Search REST Endpoint. See image below for more details.
Coveo Diagnostic Page REST API Error on Docker
As usually, I copied the API end point URL and hit in the Browser and it serve the request with no error. It is HTTP-200 response with valid JSON result.
The error in the log file also not giving any lead either.
Coveo.SearchProvider.Applications.BaseVerifier.VerifyComponent(:0) ERROR StateVerifier has encountered an error while verifying the component "Coveo Search REST Endpoint".<br>Exception: Coveo.SearchProvider.Applications.StateVerifierException<br>Message: Failed to obtain resource located at 'http://sicore930.dev.local/coveo/rest/'. See inner exception for details.<br>Source: Coveo.SearchProvider.Applications<br>at Coveo.SearchProvider.Applications.CommonStateVerifier.TryPingRestEndpoint(String p_Endpoint)<br>at Coveo.SearchProvider.Applications.CommonStateVerifier.<>c__DisplayClass11_0.b__0()<br>at Coveo.SearchProvider.Applications.BaseVerifier.VerifyComponent(Func`1 p_VerifyMethod, String p_ComponentName)
I opened docker powershell command for the cm container and tried to request the host from within container.
Now things are little clear to me. The Coveo diagnosis page is using current host to make REST API request from IIS server running on the container. The container does not have host file entry to reseolve the host url.
So now, I started searching how to make entry in container’s host file??? I was sure, I am not the first person who wanted this kind of stuff.
Following command has does the trick. but for that we need to first fire up the command prompt of the cm container.