While working on the integrating Sitecore’s CM’s functionality with third party Digital Asset Management(DAM) system, I came across one interesting issue where I wanted my container applications to run on https.
The Issue
After integrating the third party DAM with Sitecore CMS, it found out that, while using local website on developer machine, the developer is not able to load the SSO login page. While loading that page below error messages logged in browser’s console.
Access to the WebCrypto API is restricted to secure origins. Compact View requires HTTPS when used outside localhost (for development).
As clearly stated I am not using localhost as host to access my cm and seems like CM needs to be securely severed over https where as we, for local development, use non secure protocol http.
The Fix
The solution is simple looking form 35,000 feet. Needs CM urls to be serving content over the secure HTTPS protocol. But when actually started digging in details, it is fun and very learning experience.
Performed following steps to achieve this on our local docker development environment.
- Clone or download below repository
https://github.com/michaellwest/docker-https
- Open the
startup/createcert.ps1for editing and change following parameter’s default value
- $certificatepassword – from b to more secured passowrd string
- $dnsNameList – by default the value is *.dev.local. Change this value to match your host pattern. You can specify individual host comma(,) separated.
Note
Alternatively, you can can pass those two as parameter while firingcreatecert.ps1command.
3. Open docker-compose.yml file and navigate to cm service and perform following changes:
- Add new environment parameter HOST_HEADER and set cm host value to it. If you have multiple host(this is what in my case), specify them semicolon(;) separated list. For example host1.dev.local;host2.dev.local
- Under the volumes bind the new volume for folder startup to c:\startup path of container.
- Under the port bind the https’s default secure port 443 with the next available container port
Note
The container host port needs to be new port which is not been use by any other services.
- Lastly, change the entypoint to the path of startup.ps1 file under the startup folder bound under the volumes in above step for startup folder.
After all above changes to CM service of docker-compose.yml file will look something like below
services:
  ...
  cm:
    image: ${REGISTRY}sitecore-xm-cm:${SITECORE_VERSION}-windowsservercore-${WINDOWSSERVERCORE_VERSION}
    entrypoint: powershell.exe -NoLogo -NoProfile -File C:\\startup\\startup.ps1
    volumes:
      - .\src:C:\src
      - .\startup:C:\startup
    ports:
      - "44001:80"
      - "44002:443"
    networks:
      default:
        aliases:
          - cm.dev.local
          ...
    environment:
      HOST_HEADER: cm.dev.local
      ...
4. Copy folder startup and it’s content to same folder where your docker-compose.yml file is.
5. Open the powershell in elevated mode and execute following command
PS> cd <<docker-compose.yml file's folder path>>
PS> ./startup/createcert.ps1
Above powershell script will generate three files cert.cer, cert.pfx and cert.password.text under the startup folder.
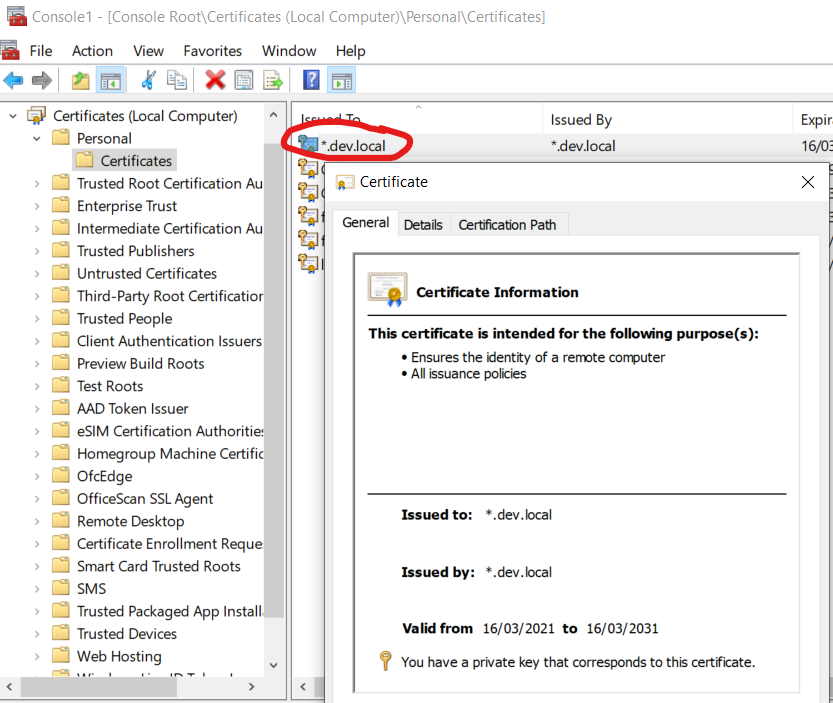
This command will also generate the self-signed wildcard certificate and install to your system’s local certificate store under personal.
To verify that run mmc and open local computer certificate store.
6. Now, is the time to fire up the container for sitecore. To do so run following docker compose command
PS> docker-compose up -dAfter successful execution the container services will be up and one can access the host binding with https. For example https://cm.dev.local in this case.
Advance trouble shooting
- To check the certificate is exist after the createcert.ps1 script execution. This command can be run on both your local and against cm container as well.
PS> Get-ChildItem -Path cert:\LocalMachine\Root


PS> Get-ChildItem -Path cert:\CurrentUser\Root
- To verify the binding under the container’s IIS for the specified hosts use following commands
PS> Get-Website -Name 'Default Web Site'- To get all the bindins and their port details for a website
PS> Get-WebBinding -Name 'Default Web Site'